April 19, 2012

Imagine Happy Birthday Card

WoW! Is it almost the weekend already? Today, I have made a card with my Imagine for a couple of challenges.


DEETS:
4.25 x 5.5 kraft card card base. Red & green check paper, cow, sun, cloud, balloons are printed with the Imagine.
Cow is layered 2x for thickness, head is pop dotted. Sun was layered 2x and pop dotted. The cloud paper/scallop punch was punched 4x and glued together for thickness. Punches are from 2 different MPS sets and ink pad is black momento. White button from M's $1 bin and twine is twinery.


Carts:
Balloons (2.75), red check (4"), cloud(paper is printed and cloud is an EK punch) are from Best Friends. Sun (2"), cow (4"):, green check paper(cut at 5.5 and then cut down and corners rounded) is from Imagine More.
Bold

Challenges Entered:


1). Paper Playtime #71-- Say it with Sentiments. By 4/28 noon

2). Bitten By the Bug 2 --Bday card w/balloons by Sun 4/29

3). My Craft Spot #52-- Make it pop--use dimension by Mon 4/23


April 18, 2012

Here Kitty Kitty...card for PK Challenge & Wobble Wed.

Better late than never. The Peachy Keen "Anything Goes" (as long as you use a PK stamp)
ends in 2 hrs. I was waiting for some inspiration. I saw our grey kitty batting around a blue ball today and there you go. LOL


Here is the action wobble on the ball of yarn
This is for:

1) Peachy Keen 13 Anything Goes Challenge (must use a PK stamp) X

2) Wobble Wednesday #6--Make a project with a pet on it and put it on your Wobble
by Tues 4/24


DEETS:

5x7 kraft premade card stock. Scalloped frame is from Lacy Labels at 4.9 x 6.9 and Basic Grey striped paper from Max & Whiskers. The inside mat is 4.9 x 6.9 and Basic Grey coordinating paper from same line. The action wobble is on the ball of yarn

Cat was cut at 4" and from Meow with the facial features hidden on the gypsy.
Cute little facial features are a Peachy Keen Stamp Tear Kitty Face Parts. Eye was colored green and used white sakura pen. Cheeks colored pink with a derwent pink watercolor pencil.

Ball of yarn from Meow at 2.5". Sentiment an EK success scalloped punch(punched 4x for thickness) in coordinating Basic Grey paper with a MPS stamp (Even More Punny-licious)


A card for Frosted Designs, FCCB #107, Cricut Cardz #106

Happy Wednesday Everyone! I'm anxiously awaiting some new Peachy Keen Stamps--"here kitty kitty" and I ordered with my reward pts Imagine "Nursery Tails." Today I have made a card for 3 challenges using my Imagine.


Shows the dimension of layering 3 layers together

Frosted Designs Fabulous Friday
--"Weather" including in your project clouds, sun, rain, snow or rainbows. X

Fantabulous Cricut Challenge Blog #107--Include an umbrella, rain or clouds on your project
Due 4/22

Cricut Cardz Challenge #106
--"April Showers" Card using umbrella, rain boots, clouds, rain using any carts and colors. Due Tues 5/1


DEETS:

Card is kraft 5x7 card base. Images printed/cut from the imagine. I used the layers of the image and glued down for extra dimension. (3 layers for the umbrella, cloud, girl, raincoat, boots)
Momento black ink, sentiments inside card from recollections and "smile" from Emma/MCT.

Carts: Imagine Enjoy the Season for the girl/umbrella/sky/rain/clouds. Cloud/rain background cut at 6.5, girl with umbrella and all layers cut at 4.5. Flowers at 3"

Thanks for looking!


April 17, 2012

Card for Cooking with Cricut #81 Card Outreach

Hello Crafty Friends! I spent my weekend working at Bath and Body Works and planting flowers. I'm officially done with the flowers. We have a lot of bunnies and squirrels hanging out in our yard...they better be staying away from my flowers LOL!!

So this is the last card I needed to do for the Cooking with Cricut #81 Card Outreach Challenge that ends in a couple of hours. This card is for Patty, who is 13 and fighting neurobastoma.

Deets:

5x7 white card base. Pink check paper from DCWV "Nana's Kitchen". Card was designed with the imagine and the clouds were printed from "Best Friends (scalloped rectangle). The cute hugging rabbit and duck were cut at 4.5" and I cut the layers just to add some dimension and that is from "Enjoy the Season." Tree was cut at 3.5 and from Stretch Your Imagination. Grass was from Create a Critter. Sun was at 1.25 from Simply Charmed.

Sentiment was from Studio G from the $1 bin at M's and the ink is black from Momento.


April 12, 2012

How about some pink? Card for 3 Challenges & for "Feel the Love"

Hello crafty friends! I love pink!! And, I found three challenges to do a card for. One of the challenges is so important and I hope you will consider doing a card for this sweet little girl.
Her name is Emily, she is 6 and has leukemia. Go check out the wonderful blog of the creative Madison/Funky Cards to find out more about the "Feel the Love" card project she does each month. CHALLENGES ENTERED:

1) The Cuttlebug Spot Sketch Challenge --Choose your theme, just follow the sketch below X


2) Cooking With Cricut #81 Card Outreach
There are 2 girls to make cards for in the card outreach to help cheer them up while they are battling cancer. I made mine for Emily and this will be given to Madison at Funky Cards for her "Feel the Love Project" X

3) Celebrate the Occasion #58 Project using pink and "Just Because" X


Details:

This is a 5x7 premade cream color card base. All the coordinating papers are from Canvas Corp (zebra, then flowers, then stripes, then the cream which is the opposite side and I embossed it)
The zebra is 5x7, floral is 4.25 x 5.75, stripe is 4x6, stripe is 3.75 x 5.5 and cream is 3.25 x 4.75

I used the Once Upon a Princess Cuttlebug Embossing Folders set (butterflies).
The butterflies at the top were cut several times and layered for depth. The top layer I just glued the body down so the wings would "Pop up." I used the Serenade cart and the butterflies are at .90, .75 and .50. I cut from the same paper as the card.

Sentiment was cut using an EK Success punch from the zebra paper and stamped in black with Momento ink.

Thank you for looking :)


April 11, 2012

Card for Paper Playtime #71

Good Evening Everyone! Sitting here watching American Idol and downloading a challenge card.
I'm watching my favorite contestant now on AI--Philip Phillips.

This is the first time I've entered a card for Paper Playtime #71 April Showers, use an umbrella.


DETAILS:

This is a 5 x 6.5 premade kraft card base. I rounded the corners with a CM corner rounder. The papers are all coordinating from 3 Bugs in a Rug "April Showers. I used 3 different ones (front and back). I just LOVED the bright Springy/rainbow colors. I thought it appropriate to have an umbrella to also use the rainboot paper. I pop dotted the mats under the umbrella for some depth.

The cloud is cut out of another cloud paper I had and then pop dotted. I pop dotted it for some depth. The sun has a face stamped with Peachy Keen stamps Wide Eyed Kids. The loop border on the front is a MS punch.
Inside sentiment from Emma/My Creative Time "Turn that Frown Upside Down."
Sentiment inside card is computer generated.

CARTS USED:

The center mats are cut using Lacy labels at 2.95 x3.75 and 2.50 x 3.15. Umbrella is Create a Critter at 2.10 x 1.85. Sun was cut at 1.25 from Simply Charmed. Inside of card was just cut with the cutter and the MS loop punch.

Thanks for Looking!


April 10, 2012

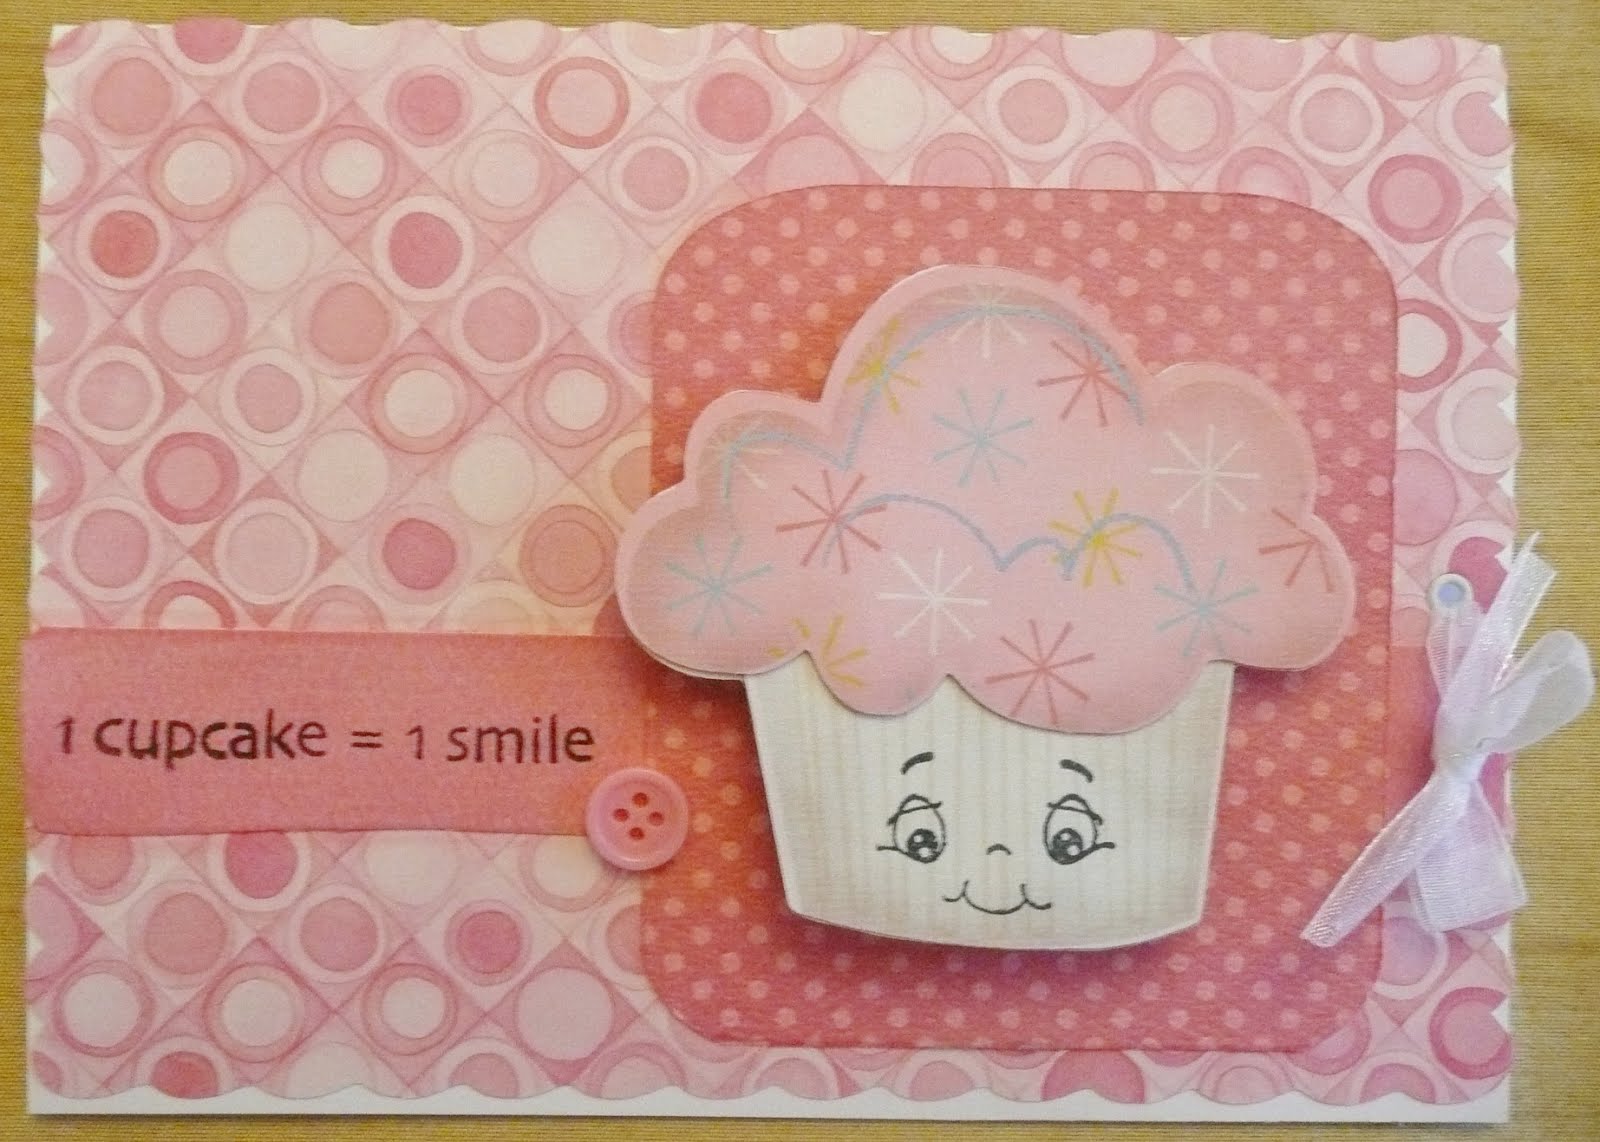
Birthday Card for 4 Challenges

Hello again! My dd has a bday party this weekend so I decided to make one card where I could also enter it in 4 challenges. My design starting point was the Peachy Keen Sketch challenge.


Challenges For:

1). Peachy Keen Stamp Sketch #12 X
2) Fantabulous Cricut Challenge Blog #106--project with at least 1 button and bow X
3) My Craft Spot Monday Challenge #51 Inside and Out Sentiment X
4) Wobble Wednesday #4 Birthday (in celebration of the Scrapbooking Queen turning 50) X

DETAILS:

This is my first time using an action wobble and I believe first time posting a project using my imagine.

Card size is 5 x 6.5 white card base. The pink patterned paper used for the background is an oldie but good from CM. The Pink swirl and dot is Bo Bunny and is actually 2 sided paper. Pink button from the $1 bin at M's and white organza ribbon is Offray from H/L. Eyelets are white from H/L.

Stamps
:
Face on cupcake is from Peachy Keen Wide Eyed Kids. Sentiment on front and inside
is from MPS "Sweetest Cupcake"

Carts Used:
Imagine and the cart "Better Together for the cupcake at 3". I cut the printed cupcake as 1 piece and also cut the layers so it would have some thickness and depth. Also, but printing/cutting the layers, I could glue the blank (no face) layers so I could stamp my own face.

The pink scalloped patterned paper was cut using Lacy Labels at 4.95 x 6.45. The rounded corner square cut from Just Because Cards at 3.25 x 4. I took that same shape and customized the shape to 6.5 x 12 for the strip running horizontally on the card.


A birthday card my 10 yr old made

Hello Crafty Friends! 2 weeks ago my 10 yr old dd wanted to make my MIL a bday card. My MIL LOVES to do crosswords. We saw a crossword rubber stamp at Js and knew we had to buy it.
My dd made this entirely by herself--with a little coaching from me. So proud of her!! She had to do a little math to figure out how to cut the paper into a patchwork and make it fit the card size and for the eyelet positions (nothing wrong with using math, huh?)


April 9, 2012

A little late, a Valentine's Day card

Happy Monday!! Ok, how much candy did you eat from the kids' Easter baskets and what is your favorite? My favorite candy are the whopper robin's eggs. We had BBQ chicken and I made my FIL's favorite--fruit salad and curried deviled eggs. (see my recipes "What's for dinner" for the fruit salad recipe) I love LOve LOVE deviled eggs with curry (I use Garam Marsala spice)

Here is a little blast from a couple of month's ago. A Valentine's day card for my daughter to give to her teacher

DETAILS
Card is 4.5 x 6 Kraft card base. I wanted a patchwork look so used some papers from 2011 MS V-Day paper pack and a Bo-Bunny paper pack. Heart glitter stickers are from recollections.
Bingo stamp from Emma/My Creative Time. Organza ribbon--offray. Black dye ink pad from Staz-On.


April 8, 2012

Have a Blessed Easter

Happy Easter Crafty Friends! I hope all of you have a wonderful and relaxing and loving day with family. The last 9 months have been trying for our family: September was my FIL getting diagnosed with brain cancer, my Mom having a stent put in, I turned 45, my DD turned 10. I had a fender bender in the mall parking lot. November my son was sick the first 2 wks with respiratory stuff, then after that we didn't celebrate Thanksgiving because I had pink eye in both eyes, a double ear infection and sinus infection--gave it to my DH and so to protect the kids from getting it, sent them to stay with family. And, I guess I was washing so much laundry our washing machine died--$500. Then we had a sensor go out on a car to the tune of $800. By the time we got to Christmas, I was so emotionally and spiritually just drained and just felt attacked and beaten up.

But through tough times, I learned that family, love and my faith is THE most important thing. I'm such a planner and organizer...I had thanksgiving all planned out--it would be both sides of the family plus relatives from Colorado. And, of course was so disappointed to stay at home curled up in a blanket with sweats on. My Mom told me to just let go, let God take control and trust HE will take control. When you get to a point that you say "I can't change the situation, it is what it is" that is when God has to change it for you.....give you favor.

I've have learned the true meaning of taking things one day at a time. And, you know what? I feel less stress and anxiety, am less disappointed because I don't over plan now. I am more joyful because I realized I could either sit around and feel bad for all that has happened OR to turn toward God and my faith. I think this has been the reason it has seemed so easy for my to change my eating habits and get healthy and loose weight. I let GOD take control of my troubles & anxiety. I put myself in my FIL's shoes and realize with cancer, all he can do IS to take things one day at a time! To wake up each day and thank GOD he is alive one more day to spend with us. That was a wake up call for me.

I'm a more more relaxed person now and enjoying life soooo much with my hubbie and kids/family. So thankful for them. Makes me realize the true meaning of Easter--it is HOPE, it's about LOVE, about new BEGINNINGS and letting go of what you cannot control to SOMEONE who can control it!

Enjoy your day!

April 7, 2012

Another Easter Card/Card for Wacky Wed Challenge

Happy Saturday Crafers! I have today and tomorrow off work. Did you know I work part-time at Bath and Body Works?? It is sooooo much fun!!! The atmosphere is positive, co-workers are awesome, great product, freebies, I get out of the house a little and feel like I'm paying some of the bills.

Here is an Easter card I made for my 4 yr old.


Details:
Card base is white 4.5 x 6

Carts Used:
Chick is Create a Critter at 2.75, topiary & pot is from Freshly picked, cut at 3. Eggs from Doodlecharms and cut at .90. Egg cut from simply charmed. Grass cut from EDPD
Sun cut from Life is a Beach (face at blackout so I could stamp) Clouds cut from Paper cuts but not layered. Rabbit Ears from PDDU

Entering this in the More than Favors: Wacky Wednesdays #68 Easter/Spring Challenge


April 6, 2012

Easter already?? Card for Easter Challenges

Well since Easter is Sunday, that means it's time to plant my flowers. Here in Oklahoma we have such whacky weather...of course it has been in the 70's and 80's....you never know if you might dip down to low temps at night and kill the flowers and the hard yard work. So, my philosophy is never plant flowers till after Easter.

I hope all of you have some wonderful family plans for this weekend. After Church on Sunday, we will go to my in-laws for the kids to find eggs and eat dinner.


I wanted to share a card I made for my 10 yr old daughter for Easter.


I'm entering this in the following challenges:

1. Cooking with Cricut #80 Easter challenge X
2. My Craft Spot #50 Easter Challenge X
3. Creative Cutter Room (Easter or Bunny) X
4. Fantabulous Cricut Challenge Blog #105 (project with an egg on it) X
5. More Than Favors: Wacky Wednesday #68 Easter/Spring X
6. DL.ART Thankful Thursday Challenge (Any project showing what Easter means to you.)
BY 4/21


Details:

4.5 x 6 white cardstock base. Blue textured paper for sky is Bazzil. Green patterned paper I used a martha stewart punch for grass. The quilted paper for rabbit was DCWV Nursery. Black stud for eye is paper studio/HL and yellow rhinestones are StudioG.

I altered things a bit vs the book by putting flowers on the grass stems . I turned the dragonfly the opposite way from how the book shows. I then used pale pink fairy dust glitter on the dragonfly. Added black ink stitching on the rabbit. Cuttlebugged the small eggs.


Carts: Kate's ABC's for bunny and cut at 3.5. I cut this like 3 times to practice cutting up the rabbit to get it to look right. After cutting the rabbit into several pieces, I then traced/cut out onto patterned papers for the quilted look. I'm sure there was an easier way to do this LOL.
Probably should've put my patterned paper onto the mat and cut the rabbit out like 5 x onto patterned paper then cut the pieces and and put back together. But, that would've been a waste of paper.
Basically, I cut the rabbit loose from the grass patch and used that as my pattern to cut up. I cut another base in brown and left it intact to glue all the pieces to. (make sense?)

Doodlecharms for the eggs (I think at .90...I did them last yr so don't remember)


Hello Crafty Friends...been a long time

Hello everyone! It has been so long (almost 7 months) since I've posted on my blog. I just needed a break to deal with life and family issues. It has given me time to reflect on things important...life, family, health & love.

One of the last times I posted, it was to say my wonderful FIL had a brain tumor (around Labor Day). All looked good, quarter sized, stage 2 & completely removed. Radiation was completed after Christmas and he was doing great with physical therapy. Then 2 weeks ago, after having severe headaches and an MRI, discovered it had returned in a different and inoperable place in the brain. Like I said, it has made us realize family, love and cherishing every moment is so important.

I have been focusing on my health and I have lost 15 pounds....from 164 to 149. Can I say I feel remarkable!! How did I do it? Eating smaller meals, snacking consists of things like veggies, nuts. Oatmeal in the mornings with blueberries, walnuts and chia seeds. Cutting down on portion sizes and walking just 1 mile 3x per week.

Anyway, believe it or not, I will actually be posting some projects. I have so missed sharing what I make. I have been crafting and realized over the last 2 weeks when I had my son's, nieces and Mother-in-Laws birthday back to back and made their cards how much I NEED to craft and share it. It brought such a smile to everyone's faces on the despite getting the sad new in the middle of it all.

Happy Crafting

September 11, 2011

An update, Will be crafting again

Hello Crafty Friends!

Since today is a reflection on what we were doing 10 yrs ago, I thought I would say that 10 yrs ago on Sept. 11, 2001, it was hot in Oklahoma, I was a week away from turning 35 and 2 weeks away from giving birth to my daughter. I was at work where I just happened to handle inside sales for New York and New Jersey. A year before, I had actually been to NYC and been in the twin towers.

Thank you to all of you for understanding my time away from crafting and blogging. And, thank you to those who posted some encouraging thoughts and words. I truly appreciate it!!

Things for now are calmed down. My FIL is still in the hospital but going through rehab. He spends 15 more days there, but will not leave till he can walk out on his own. He had a quarter size tumor on the right side/forehead area removed. It was stage 2 and was a type of tumor that is normally found in youth/twenty yr olds.....not 73 yr old men. So that was actually a good thing. If you remember high school biology, brain works opposite sides of the body. So tumor is on the right, removal effects left side of body. Due to temporary brain swelling etc, (effects the nerves) has to regain function on the left side of the body. He has to learn how to chew food, without biting his tongue, take small bites of food and learn to swallow the right way . For now cannot have meat. His speech is marvelous. He has to retrain his brain/body connection on how to use muscles in left arms and legs. Everyone (Dr.'s and physical/speech therapists) are just amazed at the progress.

And, we got marvelous news today that an MRI of his spine (to see if the cells had migrated to the spine...as this type of tumor can) is totally CLEAN!! YEAH!! So, he will only have to have radiation and not chemo.

As for my Mom, she had another stent put into her artery. That one was 95% blocked so she was just a walking "potential" heart attack. She is doing great too. She just hates being on the blood thinner meds and stuff.

I have just been so stressed out, worried etc. Now that things are calmed down some, I will be crafting again. Gotta go check out what challenges I can create projects for. : )


August 29, 2011

Won't be blogging for a few more weeks-- family crisis

Hello Crafty Friends!

I have some very personal family things going on now and they need me. In all of the 14 yrs I've
been married...I've never seen my hubbie cry. We found out today that my FIL is in the hospital with what appears to be a quarter size tumor on the front/forehead part of the brain. They are doing another more detailed MRI Tuesday to determine all the stuff like nerves around it etc and to help them when doing a biopsy. He's a vibrant, giving and loving man who loves to golf. We don't know the extent of things yet but since they live locally, need to be available for my MIL and hubbie.

Then, my Mom just told me tonight that she has an appt with her cardiologist on Wed, as she has been having some issues. She had a stent put in 2 yrs ago.

If anything, just say a prayer for strength for me as I help my family keep it together. I tend to be a worrier and over analyze things and I just need a sense of calm to help others now. And, my prayer is that when they do the biopsy for my FIL this week that it will be better news than what our minds are letting us think. And for my Mom, my best friend that her heart is ok.

I can only hope through all these situations that my ENTIRE family realizes and believes that GOD still loves us and performs miracles all the time and that we always need to look to HIM for comfort, answers, peace, love, faith peace and....healing.

Thank you all for understanding my short spell away from blogging. I miss being crafty and entering projects in all the challenges. I really wanted to share a few things about my new imagine.

August 17, 2011

Hello, I'm going to be away the rest of the week

Hello Crafty Friends!

So sorry I've been unavailable. DD is starting school in a week and have had a ton of stuff going on to get her ready. I've also been busy trying to figure out my imagine--which I STILL love. We got a new cat (Lucy, a 3 yr old white and grey female) and trying to get our other cat Poofy from "slapping her silly" has been a lot of work LOL

And, I've been painting the house. I get in these moods where I need a kick in the behind to get creative enough to craft again. I just haven't been feeling crafty the last couple of weeks. So, I decided to repaint the interior of the house instead to get myself back to feeling creative again LOL

Happy crafting to you!


August 11, 2011

My time with the Imagination day 2

Ok, I really think I'm in love. I'm not trying to be an enabler but....I'm so happy I got the Imagine over the Expression 2. Set up was a breeze, just follow the directions for the quick set up that's included. Update your gypsy. Update the Imagine with the white cord included --hook to your computer and click on cricut sync. Took all of 15 minutes. Suggestion for that: a message kept popping up for me to install the "PnP driver" I wouldn't do it because I don't like downloading unknown stuff to my laptop. I later found out you MUST download the "PnP driver" to your computer because that is what helps give prompts/ gets the updates from sync to the Imagine. Once I did that....easy peasy. After I did the Imagine update, then I was able to officially download a cart to the gypsy.

This morning I put in my Winter Woodland cart and decided to print/cut one of the birds. I laid everything out with the gypsy. Was able to pick the colors through that. (because I had my Enjoy the Seasons cart already downloaded to the gypsy) There were 3 layers to the image I wanted to do. I colored one layer yellow, one brown and one layer blue. Then sized it and printed it out....easy peasy. No laying out the paper colors on a mat or anything. To me, the cuts are crisper and cleaner and seem to go together more exact.

Only drawbacks for me today are: I'm so use to using all the creative features with the gypsy and you just can't do that with the gypsy/Imagine(like hide/contour, weld etc) But, the coloring your individual layers the way you want on ONE sheet of white paper is greate (and not laying out all the pre-colored paper) You cannot print a "combined" colored layers as ONE image with gypsy to imagine. You have to color/ print/cut the individual layers through gypsy to Imagine and glue together. Where as if you wanted to color individual layers JUST through the imagine, and then combine as ONE printed image to cut....you CAN do that. (make sense?? LOL)

Other drawback (I think) is you don't have control over how close your images print (even with using the gypsy to the Imagine) and so it seems I have more paper waste. I don't know about you but when I lay out images on my gypsy, I'm zooming in trying to cram and rotate stuff around as close as possible to minimize paper waste. So, I suggest if you are printing/cutting to load up that 12 x 12 pc of paper with lots of stuff. Otherwise, you will be trimming your scraps.

One cool thing you can do is called cache'. That is where....let's say....I have up to 3 printable paper patterns from my "enjoy the seasons cart" that I LOVE and want to have available stored to the imagine to use for another Imagine cart. I can take ONLY 3 and no more patterns from any imagine cart and store as part of the color/pattern choices for future carts (including the regular cricut carts) You can easily delete and add new patterns to store to the imagine...but can only have a max of 3 at a time.

I had a question of what videos did I watch to help me learn what to do:

First of all, I went to the cricut board and asked questions and read everyone else's questions. I also watched these

http://www.youtube.com/watch?v=Uzxscxk69s4&feature=related
http://www.youtube.com/watch?v=DDk_Fen6MXM&feature=related
http://www.youtube.com/watch?v=w18PZB2LEbA&feature=related
http://www.youtube.com/watch?v=2gbJrx-HPMI&feature=related
http://www.youtube.com/watch?v=c5HS5qh6PKI&feature=related
http://www.youtube.com/user/provocraft#p/u/38/hW3OXhAmZX4


That's it for now....


August 10, 2011

I have quite the "Imagination"

Hello Crafty Friends!

I know I haven't been around very much. I just needed to take a little creative break. Guess what knocked on my door today? It has quite the "imagination!" LOL

So far, I have plugged it in, put the ink cartridges in, put the Imagine More cart (that came with it) in to do the update, and used one of my carts to just play with some printing. My family will only allow me to have ONE of my new carts to use now before my birthday ( chose Enjoy the Season to play with).I have to wait till September for my bday present to get the other 4 carts: Better Together, Best Friends, Kate's and Yummy.

I haven't updated it through Cricut Sync yet....kinda afraid to. So far, it was easy to use. I really want to try to get to the technical stuff of printing off individual layers and be able to color those however I like and then to be able to use my regular carts with it.

Probably my only "Uh-Oh, why did I do this moment " is with the size of the machine. It is HUGE!! and if space is an option for you then...wait to purchase till you have a permanent spot for it. This is a machine that has to stay where you put it at because (1) you calibrate the print/cut based on where it has it's home. you move it, need to re-calibrate it. (2) it's heavy and just for that you don't want to move it. (3) It takes up a lot of space on the work space.

But....I am already really happy with it. Once I can get really creative with it and use to it, I know I will be in love with it. It is easy to navigate through the screens, and I figured things out before even opening the book. I had looked at lots of videos first to get familiar with what to do.

I can also say that if you get an imagine, the first cart I would try to get is enjoy the season. It is just so stinkin' cute and versatile with different images for seasons/holidays.


August 4, 2011

Ok, tell me I'm bad.....and a crockpot recipes

Hello Crafty Friends!

Sorry I've been MIA, been trying to get some scrapbooking done, it's been hot, we've been inside mostly during the day (41 days of over 100 degrees and yesterday was 113) and trying to keep the kids from seriously hurting each other LOL Do you know that feeling? LOL
I've been using the crockpot a lot since it's too hot for the oven.

Ok, I've decided to get an Imagine (rather to have dh get me one for my bday in Sept)
Is it bad I've gotten a couple of carts cheap on ebay before I even have the machine? LOL
I got Best Friends for $16.10 and Kate's for $20.50. UPDATE: I guess I'm the proud owner of an Imagine for $134.88 Shhhhh...don't tell hubster I bought my own bday present for him to give to me.

Here is a crockpot rib recipe I made yesterday. It is a regular for us and everyone loves it!!

Crockpot Pork Country Style Ribs

**However many packages of Pork Country Style Ribs you need (I use 1 or 2 depending on how many in the package) Can use bone in or deboned. I must say that beef country style ribs don't come out as good in the crockpot.

**McCormick Grill Mates Sweet and Smoky rub
** 1 cup of BBQ sauce, I water it down with 1/2 cup of water
**(optional) sliced onion

I rub the ribs all over lightly with the rub
Place sliced onions and bbq sauce in the bottom of the crockpot
Put ribs on top and cook for 6 hours.


Here is another recipe I used on Sunday and there is usually enough left over the next day for either BBQ sandwiches or I use it for beef stroganoff or even stew or chili.

Roast

1 chuck roast
1 package Lipton Onion Soup Mix
2 cups water
1 bay leaf
**Optional vegetables

I brown the roast in a skillet on top of the stove with a little cooking oil (to seal in the juices)
and sprinkle with a little garlic powder and black pepper.

Mix water and Lipton Onion Soup Mix together.
Pour into crockpot, place roast on top with bay leaf and optional veggies. I cook on low for 8 hrs. However, I find in my crockpot it's usually done in 6.



August 1, 2011

Wow! Aug. 1st already... Please make Cards for Madison at Funky Cards

Happy Monday Crafty friends!

I've got some projects for challenges to create this week. I spent the weekend organizing aaaAAAlllllllll my paper LOL (do you feel like that?) Since I do double 12x12 layouts (1 for dd and 1 for son, then if I'm lucky...one for the "family") I always get 6 pcs of whatever paper I want for the theme of the pics. Then, if I really like the paper I will get an extra sheet or 2 for cards.

Well, I have been lately digging into my stash for my layouts to do cards. So,I spent the weekend re-organizing the paper. I separated out all my printed paper scraps and the oddball one of a kind papers vs. the printed papers I had even numbers of for the scrapbooks.

I got one 2 of those big zipper 14 x 14 cases and organized my paper for cards (by Easter, V-Day, Christmas, Halloween..., then seasons, School, Winter, BDay, Flowers, Animals, etc. So now I know exactly where to go for the paper for cards and can keep better track of my scraps.

On a different note...

Please go check out Madison at Funky Cards. She has a special monthly project called "Feel the Love," where she fins someone who is going through a rough time and needs some love through cards, and their spirits lifted.

This month she found a special family where one of their children who is 7, has a brain tumor. Her name is Kate, and she also has a brother who is 6 and a sister who is 9. It would be awesome to make cards for all the family. I hope you will consider doing this for the family.
It is such a wonderful opportunity to share our talents/craft while lifting someone's spirits.

Have a great day everyone!
Related Posts Plugin for WordPress, Blogger...