March 31, 2011

Hello!

So, I just got done watching Robyn at My Pink Stampers video on the new Expression 2. It is VERY cool! Repeat after me...I do not need it...I do not need it!! LOL It evidentally has some preloaded carts on it and I'm curious to get a look at those handbooks.

So, I never have entered any challenges before so I thought I would start.
Maybe some of you haven't done this before either. I'm going to try the challenge at Fantabulous Cricut, where the theme for this week is to create a project using any spring time theme. There must be a "Cricut" image the project. Challenges start on a Monday and have to be finished/posted the following Sunday evening. Then, they announce the winner on Wednesday.

Also, I noticed a common theme for requests/posts(see the posts for my blog candy) to see how to use your heat tool. I'll be honest and have only used it one time and it was used to dry some white puffy paint on a bowl I cut from FMK so it would look like whipped cream. I have embossing powders etc and just have never used it. So, you all have inspired me to try something new. I'll tackle that soon.LOL

Have a good day everyone :)


March 28, 2011

Birthday Card

Hello everyone. Good Gravy! I cannot believe in less than a week I went from 42 followers to 74--WOWSERS!! Thank you so much everyone and I hope I can live up to everyones creative expectations :)

I mentioned in previous posts I had a lot of birthdays in March. Last week you saw the picture frame card I did from my 3 yr old son for my MIL's birthday. I was bad and didn't do one from my hubbie and I.

But my 9 yr old wanted to do one. She knows my MIL likes birds and the color purple. So, she picked out the papers and went through a few of the cricut books and tol me what she wanted for a picture.

Then, she tells me she wants a "long fold up card!" I have never ventured out of my box to do anything like that. So I got my gypsy and my favorite card card--Gypsy Wanderings and started trying to figure it out. LOL ~~~~~~~~~~~~~~~~~~~~~~~~~~~~~~~~~~~~~~~~~~~~~~~~~~~~~~~

Go take a look at Sheila at She's a Sassy Lady's video and this is what started our inspiration for a window card with a phrase inside. I'm sure there were easier and quicker ways to do it but it took me a bit to get the words "Happy Birthday" positioned just right inside the frame. And, even though the words WERE already welded together in Gypsy Wandering, I STILL had to "weld the welded phrase" to the frame so it would cut the way I wanted. That meant resizing and resizing and nudging and stretching. Hopefully all this makes since by seeing a little visual.

So, first I did the postage stamp frame from the GW cart at 5x7. Then I took another rectangle frame cut from GW at 5x7 and used hide/contour for the inside frame part so it wouldn't cut as a frame. Then I duplicated that. Then, I nudged all of those shapes together, grouped and welded. After that, I worked on my Happy Birthday phrase to weld as much of the wording edges as possible to the inside frame. Then, I grouped/welded the phrase to the postage stamp frame. All was cut in one shot in lavender paper.

After that, I copied the phrase and pasted to a blank layer so I could cut that in darker purple (and to give some thickness to the wording. I did that 2x) and there are 3 layers to the phrase "Happy Birthday." The blue for the sky was cut as 2 welded 5x7 cuts (the postage stamp card cut was unwelded)


Carts Used & Size:

*Gypsy Wandering (Card Base with frame, the words Happy Birthday (5.62 x 9.39), all extra card mats in the various colors) All card bases at 5x7.

*50 States--for the Robin--cut at 1.25
*Paper Pups--Clouds at .75 and .90, they are double layered clouds so I did hide/contour for the inside part, then hide/contour for the outside part so I could cut on white, then blue paper.
*Give A Hoot--Tree I think was 5" tall
*Walk in My Garden--All flowers and cut at 1" and the sign, cut at 2"
*Life's A Beach--White Chair and cut at 1.50, the welded word "Relax" was also LAB but the blackout/shadow feature and then I cut the word off the bottom of the chair.

Other Details:
Purple cardstock was DCWV and the Blue for sky was Bazzil, Green for grass was sticker paper I've had fooooorrreever from CM. I used Distress ink pad and ink applicators to shade the robin. The lilac pearls are from Michael's $1 bin and the flower on front was Prima, with another pearl glued down in the middle. I used my ATG and scotch quick dry glue. For the grass, I used a CM tearing tool and tore the green sticker paper's edges.

Can I say that cutting those flowers at 1inch was a bear to put together LOL. My MIL LOVED it and my daughter was so proud of her design work. LOL


March 26, 2011

Toy Story Birthday Card--Buzz

Ok, so here is birthday card #2 using Toy Story. My 9 yr old daughter helped me pick out the papers and figure out how to layer them. I was kinda stumped what to do for the Buzz card. LOL Thank you to my girly- girl!

Sizes:
~ Card Base is 7x14 (folded 7x7), green frame is 6.75 x 6.75, blue cloud paper is 6x6
Blue Star paper is 5.5x5.5
~Inside left scallop oval was done with real dial off and like 6 wide and 3 high,
~ Inside right scallop was done bigger, with real dial off and like 8 wide and 4 high
*****Can't remember for sure what sizes I did the oval scallops. But when I sized my "Happy Birthday, I made sure it would fit inside the oval.
~ "Happy Birthday" was done at 2 and the "3rd" was done at 2.5


Carts Used and Details:
~ Disney Toy Story, Buzz at 3"
~ Gypsy Wandering for card base and all Layers and scallop circles inside
~ EK Success scalloped punch for tag on front
~Computer, white cardstock and Minya Nouvelle font
for sayings
~ Gypsy Wanderings for "Happy Birthday" phrase
~Nates ABC's for the "Number 3"
~Outside Message "Hello Space Ranger"
~Inside Message "Time to Blast Off for Adventure"


March 25, 2011

Toy Story Birthday Card--Woody

Hello Everyone and again..thanks to all who have recently joined my blog! :) I truly appreciate it!

So, Saturday is the big Toy Story family Bday party for my 3 yr old. (his bday was Thurs.)

I asked him what kind of Toy Story card he wanted and he said "Woody and Buzz, BiiiiiiGGG card!!" LOL

So, Mama made him some big cards LOL I made a card from Mommy & Daddy that was Woody and one from his sister (she helped me on it) that was Buzz. The buzz card will be posted tomorrow.

Sizes: Card Base 8x8--I told ya it was big!!
~Layers were 7.5x7.5 for cow print, 6.85 x 6.85 for blue cloud print.
~The fence post/frame I took off the real dial size and it was like 7 high.
~Woody was at 3.5.
~Inside alphabet was at 1.5, horseshoes were at 1.25 (the one outside)and 2.5(the one inside) ~The number 3 was at 2.75"

Carts and Other Details:
~Card Base was from Gypsy Wandering, as was the scalloped frame cuts. The inside cow print scallop and the cloud scallop were the "negatives" from the front of the card cuts I did.
~Toy Story for Woody
~Outside Message says "Reach for the Sky"
~Inside wording was welded using Nates ABC's
~Fence was from PDDU and then after making the fence BIG for the frame on the front, I cut the posts apart. I ran the fence posts through the cuttlebug using a Sizzix woodgrain embossing folder
~Horseshoe was from PDDU, used ink to detail the holes
~Computer generated messages using Minya Nouvelle font
~EK Success scalloped shape punch for the messages


March 24, 2011

Window Frame Card

Ok, so I said yesterday I had a bunch of cards to do. Well, I put my 3 yr old to work today--Happy birthday to my little man today. I got some 12 x 12 archival scrapbooking canvas at H/L and cut a 5x7 piece and gave him some oil pastels and told him to color a picture.

First of all, this would've been the pefect opportunity to do my first video huh? LOL
Sorry no detailed gypsy pics. I always enjoy those because I'm sure I'm not the only visual learner!!

I got my gypsy and went to GW and used the frames. I sized at 4 1/4 x 5.5 and duplicated, grouped and welded together. On the side that was the back of the card, I used hide/contour to hide the "inside frame" cutout. All that was cut.

Then, I cut just the one frame side 2 additional times for some thickness when I glued everything together.

Then, I used just the same frame side that I just did the hide/contour on (the back side of card cut) and put a piece of the clear plastic cricut clamshell packaging on the mat. I was lazy and didn't put my deep cut blade/housing in. So, turned blade to 6, pressure max and speed max. I had to multi cut it 2 additional times but it worked.

Now, for the inside patterned paper. I used the same frame cut again but used hide/contour for the inside part for both before grouping/welding together. I cut the birdhouse paper out. Then, just used one side of the frame with the inside hide/contoured and cut 1x with the floral/vine paper.

Then, went to 
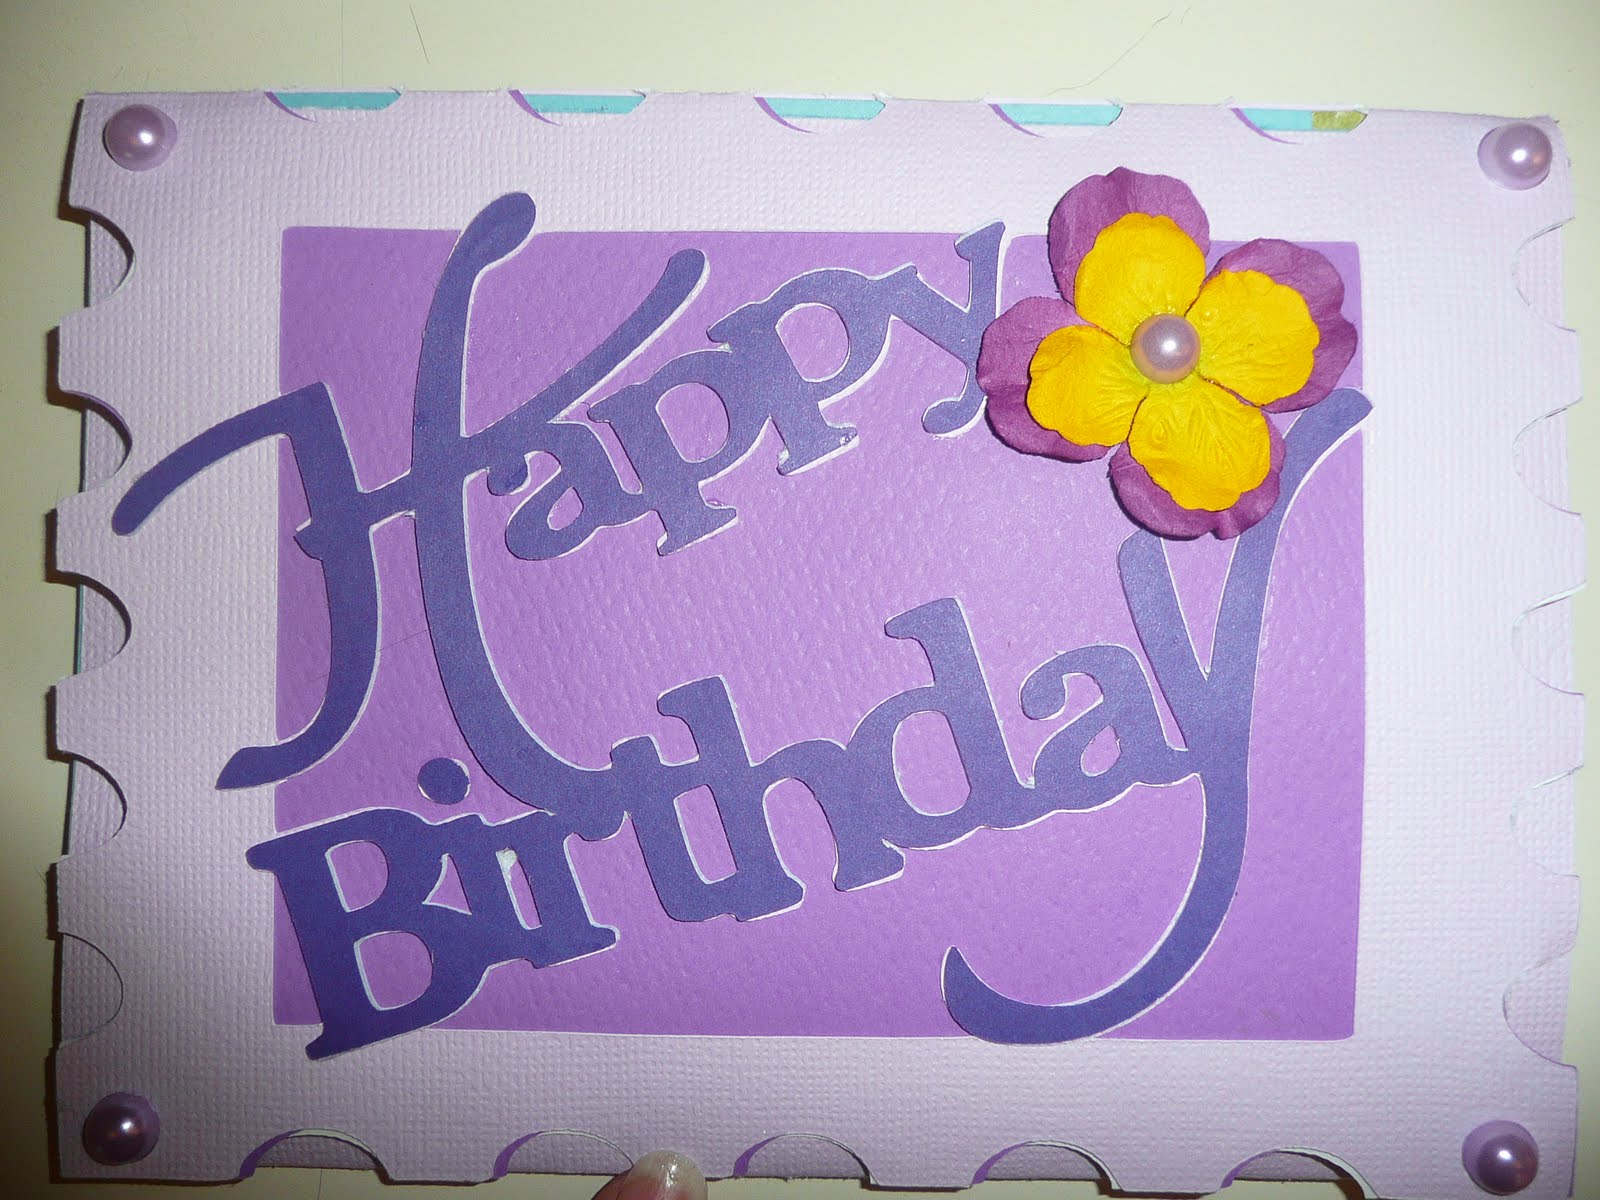
Winter Frolic and cut the tree branch 2x in brown, size at 3". I had to trim the shadow of the bird & nest off since hide/contour wouldn't work for this cut. Then, used the "Happy Birthday" phrase on GW sized at 2 in red.

The bird is from Animal Kingdom and cut at 1". The base was yellow, the top layer (without beek or legs) was in a tan. I used Tim Holtz distress ink pads & MS chalk inks and applicators to highlight the belly and wings--colors used were MS cream, walnut stain, weathered wood, and honey.

Ok, now for card base. Ran through cuttlebug and use the sizzix/Tim Holtz tree folder. Then inked entire card in walnut stain distress ink pad.

Remember the 2 extra frame layers I cut for thickness? I glued those inside the card base to give the frame part extra thickness. Then, I used my ATG to glue the cut piece of plastic inside the frame (like glass on a picture frame). To make sure things would stay in place, I used an embroidery needle and the natural bakers twine and 2 small red buttons to go completely through the plastic & 3 pieces of cardstock. I left ends long on top of the button so I could tie a bow. It was hard using the needle through all those thicknesses so I had to also use some needle nose pliers to pull through.

Ok, for the "art masterpiece" LOL I wanted it stiffer so I painted a thin layer of Modge Podge on both sides of the canvas. It took 30 min to dry. Then, I ran a layer of the ATG tape from the inside of the card on the plastic. Then, I thought "THAT WON'T HOLD" so I also used some of the zip dry on top. I placed the canvas down so it would show through the "plastic window."
I used some of those black butterfly clips around the edges of the card to hold the zipdry/layers together while it dried good.

An hour later I came back and glued the inside pieces of cardstock to the card, then glued down all the inside details.

I just got done with this card and it took me aaAAALLLllllllll morning!! First time I ever tackled anything like this. Who knows, there was probably an easier way to do this. It was a learning and creative thinking project. LOL

But my 3yr old is so happy his little artwork is made into a card. My Mother-in-law loves birds and nature so I think it all works.


March 23, 2011

Made By Momo Blog and my Random Daily Thoughts

WOW! Thank you everyone for joining my blog. I really do want to get myself more organized to do even more projects on here! I have to get viewing all your blogs on Momo's site and joining all your blogs too!
In case you didn't know, the "Made by Momo Blog"that I follow is graciously promoting on her site that blogs with less than 200 followers can link to her blog. She's doing an awesome giveaway too! THANKS to Momo! Check out her blog by clicking on her blinkie down below and to the left.
*************************************************************************


I have been busy today shopping and organizing things for my little man's 3rd birthday tomorrow. I just got done wrapping presents, ordered the Toy Story Cake and balloons for this Saturday's family party. Figured I'd do it all know since he's in his little pre-preschool program today. Hard to wrap presents for a 3 yr old boy and hide what your doing. LOL

So, imagine my surprise when I peeled only one strip of tape off a roll, found another roll of tape and peeled only one strip off that!! Hmmmm....I think my 9 yr old dd (aka the tape queen) got ahold of both my rolls of tape I use for scrapbooking. I had to finish wrapping presents using my ATG gun LOL.....Guess it's time to buy lots of tape....and a couple of rolls JUST for her! :)

Then, I have to make his birthday card, help my daughter make one for him and then do my MIL's birthday card from the kiddos. Hopefully I can post those on Thurs and Friday.

I want to try a Window card for my MIL. I bought some of this 12x12 canvas at H/L and am going to let my little guy fingerpaint or color with oil pastels on the canvas and then try to do a window frame card and cut the canvas like it was a painting and then cut the clear plastic cart clamshell packaging like a piece of glass and assemble a window frame card.

I feel like I need 2 extra hands today. LOL

March 21, 2011

Happy Monday

Hello everyone! Hope you had a good weekend. Wanted to share the birthday card my daughter and I did for my niece who is turning 12. We just mailed it off today. This is the card from her. :)

My daughter had the idea in her head and told me what she wanted so I helped her on my gypsy follow through with what was in her head. She picked out the papers and said these colors would be a "girls dream colors for an I-pod." LOL

Carts Used: Paisley (MP3 player), gypsy wandering, card layers, Nates ABC's for font
Sizes: Card Base 5.5x5.5, Card Layers--MPS 4", Font inside card 1.05 and shadow 1.15
Details: All paper is Creative Memories. Found a square card base (The black paper, I think we used LAB) and used hide/contour for the design on that and sized to 5.5x5.5.
The Plum cardstock was a square we cut at 5.25x5.25. The purple swirly paper was cut at 5x5 using a design in GW. I used a blade depth of 2, pressure high and speed high to cut since a thinner paper.

For the MPS player, we couldn't hide/contour on the gypsy all the parts we wanted to to recut it. So, we just cut everything in several different colors--grey, pink, black and purple and decided after that how she wanted her "Dream Ipod" to look. The music notes were also from Paisley and we cut at 2, 2.5 and then used MS Hematite glitter. We ran the notes through the Xyron "X" and then applied glitter and then the glossy accents. Also, used a white sakura pen and a ruler to add faux stitching.

The white scalloped trim was this cool pearlized thick cardstock I had. I used Lacy Labels to cut a scalloped 5x5 shape and then didn't want to use it. My daughter suggested to trim off the edges and glue to the back side of the plum paper. Pretty creative girl huh? LOL

Inside the card, the plum cardstock square was 5.25x5.25 and the purple swirly square was cut at 5x5. We welded the Nates letters together for both the lavender and the shadow in the purple. Again, used a white sakura pen and ruler to add faux white stitching. W.e used some lavender jewels and silver sticker stars from the $1 bin at M's


March 18, 2011

Sentimentals Bee Card

Happy Friday!

I have so many birthdays in March and 4 cards to get done....well now 3 cards to get done before March 27.

I absolutely LOVE my Sentimentals cart!! This is a card I did for my 11 yr old niece. her nickname is "Bee," so I thought this card was appropriate. The inside of the card was a little of a pun with her nickname and the theme of the card.
Carts and Sizes: Gypsy Wanderings (the scalloped and welded black card base) at 5.5 x 5.5 and the black check is the same at 5.10. The bee patterned paper is a square frame from GW at 5". Sentimentals for the bees at .75 and 1", hive was at 2.25. Nates ABC's for the welded alphabet "Hap" at .75 "Bee" at 1 and "Birthday" at 1."
Details: Hopefully you can see that on some of the bees, I cut the black wings 2x. The first is glued to the yellow body normally and the the 2nd set of wings I just glued the body part of the wings down on top. Then bent the top wings upward. I tried to do each of the bees differently, one bee has black embellished eyes.

The inside of the card on the left is a piece of white cardstock that has been embossed with the "Bee" sentimentals embossing companion folder.


Inside the card with the embossing Sentimentals folder


March 17, 2011

Happy St. Patricks Day

Here is one last St Pats Day card for 2011. It is an A7 card

Cart: Shamrock PDDU at 2.75 and 3 inch
Supplies: green organza ribbon, cuttlebug and D'Vine embossing folder, glossy accents, MS glitter, various scrapbooking paper, black Staz-On ink pad.


March 16, 2011

Easter card 3

Hello!

My daughter loves lots of stickles, so thought I would do this card for her.

Carts: Paper Pups for Easter Dog, Give A Hoot for bird and tree, Gypsy Wandering for grass, PDDU for clouds, Simply Charmed for the sun, Smiley cards for egg shaped card base.

Sizes: Dog at 2, saying inside card at 2, sun at 1.10, tree at 2, bird at .95, grass was at 3 and cut down.

Tools and Supplies: Gypsy, Expression, argyle paper from M's at 10 cents, stickles in yellow, glam pink, cinnamon brown, purple, black embellishment for eyes

Card Base cut from Smiley Cards at 5.5 (x2 eggs) and I used hide/contour for the face inside the egg. Then, grouped and welded the 2 together. The argyle paper was cut at 5 and a blade depth of 2. Just assembled everything, used stickles and adhered the "Yappy Easter" inside the card.


March 15, 2011

Easter Card 2

Good Morning!

Here is another Easter Card I did. This will probably go to my 11 yr old niece. I got the idea from a website that sells stamps (can't remember the name) and the stamps had a similar saying except it said "My butt hurts!" I didn't want that on a kids card so I just used my computer to print off the saying I wanted. :)

Carts: Gypsy Wandering,(Bunny, grass, postage stamp cut for card) Indie Art (the word bubble), Printing Press for the solid square polka dot paper

Sizes: Bunnies at 2, postage stamp welded card base at 5.5x11 and single postage stamp cut at 5, polka dot paper square at 4.45, word bubbles at .82 and .94

Tools and Supplies: Computer & Printer, Expression, Gypsy, zig pens, black embellishments for eyes, felt flowers and lilac pearl embellishments from the $1 bin at Michaels, Paper from H/L, MS scallop punch for the bite marks

Details: I used Gypsy Wandering tag feature for the postage stamp cut (the one with the butterfly inside) and used hide/contour for the butterfly. I copied it, grouped and weleded together for pink part of card. The next layer (stripe paper) was done at 5 with the above cart/cut. The polka dot paper was done with Printing Press and I just hid one of the inner squares, this was cut at 4.45.

The "word bubbles" from Indie Art I used hide/contour for the word inside. Printed off the sayings on white cardstock on the coputer. Then cut out and glued on the pink bubbles.

Next I cut grass, and the bunnies, using 2 shades of brown. The darker brown was using the shadow feature to fill in the swirly decoration on the bunnies. I used the MS punch to punch some off the tail and off the ear for bite marks. Then, glued the black embellishment for the eyes.

Everything was assembled and I finished off with the lilac pearls and flowers


March 14, 2011

Easter Card

Happy Monday Everyone! Well, it's a chilly and cloudy Spring Break Monday in Oklahoma. I just discovered I have to get new house phones. As I was washing a load of laundry, it seems my 3 yr old boy thought one of the handsets was dirty and threw it in the washer. I had no idea till putting the clothes in the dryer.


Here is an Easter card I made for my son

Cart: Winter Woodland
Size: approx 4.5 x 6.5

Supplies: Brown bazzil cardstock, white cardstock and white velvet cardstock, MS white and pink flocking, Scotch quick dry glue, black embellishment for the eye.
Tools: Gypsy, Cuttlebug, D'vine Embossing folder, cricut expression

I laid it out on the gypsy and welded the shadow (brown together) at approx 4.5 x 6.5. I cut that out 2x to add some thickness when gluing together. Then (used hide contour for the eye) cut the white out in same size again 2x in white. The legs and ear was some paper I've had forever that has a velvety feel to it. Not sure even what it is or where I got it. So, I cut it out on a blade depth of 6 and it worked perfectly. Then, ran through cuttlebug with D'vine embossing folder.

Finally, my daughter thought I needed flocking for the tail, ear and nose. Finished off with a black embellishment for the eye.


March 11, 2011

UPDATE: Well, of course J's didn't have Kates :( they special ordered it for me though ($39.99 and free shipping to the store) and I might have it next week. Tell me why they say there are 180 of those carts in their warehouse but they don't sell them online?
*******************************************************

Well, wish me some luck everybody, if all goes as I dream I will be at the grand opening of our Joann's superstore at 9 am and get my hands on Kate's ABC's.

Also, I went to the local scrapbook store and picked up some of the new stickle colors. Oh my that "glam pink" is soooooo cool!

I've been working on how to organize all my cricut cuts. I decided just to get a photobox and make dividers up by category and then put the cuts in a baggie and file alphabetically. Maybe I can actually find what I'm looking for easier LOL


March 9, 2011

My baby is back from the Utah vacation

Exactly 2 wks ago today I shipped my Gypsy to Utah and I got it back today. That was very quick turnaround. Kudos to PC for that! Now, to hopefully get it updated etc successfully.

It took an hour and 40 minutes to get things all synced and updated. I got all my carts loaded and the one cart that gave me fits and was the reason it froze in the first place--Car Decals--is successfully installed YEAH!!

Also, I never knew you could pick and choose to not download Imagine stuff updates.

March 8, 2011

Nates ABC cuts

Hello everyone! The pollen count in Oklahoma is off the charts. The entire family is feeling punky with colds and allergies and my little man got an ear infection. He started refusing to take the medicine (it was fruity and didn't taste THAT bad LOL) and we had a crazy time trying to figure out what to disguise the meds in. No matter what, he spit it out.

Then, we got strawberry flavored carbonated water and it worked like a charm :)

*******************
So, I did some Nates ABC cuts for 3 different people on the cricut messageboard for the March RAK. Here is just a sample of some cuts I did. I always cut extras for me to keep. For those who don't have the cart or haven't seen a lot of the cuts up close, thought I would share. Most of these were done at 3 inches.

The most detailed to put together was probably the goat and zebra. This is because the body is 2 layers and then glue on the spots. Then the sign for the goat (don't ever cut smaller than 3") you need to poke out all the lettering. Notice that I didn't do the lettering on this sign. It was 3 inches and just a pain to poke out! LOL
The zebra had 2 cuts to the body and you have to glue on some of the stripes and mane.

The car was at 3" and no matter what I did, multi cut at blade depth of 1 and 2, the letters just wouldn't cut out clearly. I had a new blade so I knew that wasn't it. So, on the car letters for the license plate need to cut at least at 3.5. I gave up and just decided to stencil or computer print my lettering. LOL

FYI: on cuts that have grass, don't suggest cutting below 3" because the grass gets really thin at the top and it's hard to glue down.


Related Posts Plugin for WordPress, Blogger...