Showing posts with label Halloween. Show all posts

September 13, 2010

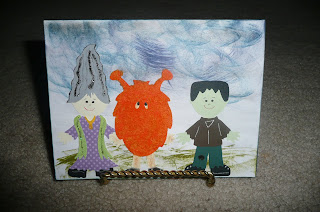
I did a real simple Halloween card. My dd and I went to M's and she saw this stamp and "We had to have it." LOL

RECIPE:
**This is an A7 card
**The "ghouls" are cut at 3" using PDDU
**The inside of the card is kind of a patchwork design by using the CM square punch (biggest one) and just cutting squares from various papers. Then overlapping and gluing down to make it look like a picture frame with white space in the middle for the stamped message.
**Used Sakura white gel pen to add fake stitching. Inked edges of white cardstock for stamping with Orange Marmalade Distress ink.
**Rubber Stamp from M's and inkpad is black from Stampabilities. I just realized after stamping it that they glued the rubber on kinda crooked.
**Stickled black and silver on the girl monster, used MS orange flocking for the orange monster and a silver sakura pen for details on shoes etc. CM fine tip pens for the face features.

OUTSIDE of card. I was not feeling creative and I did the outside of the card last. I could not think of what to do on the outside. So, my dd said she knew just what to do. So I let her go with it. LOL She took grey chalk and lightly stamped entire outside of card with it. Then, took MS navy pigment ink pad (the eye shaped ones) and started to do fluffy clouds. She also took a distress ink pad (I think broken china) and put a little different color of blue in the sky. Finally, took Tim Holtz distress ink pad in peeled paint and did some swirls for grass.
Thanks to my creative girly girl!! LOL


So I heard all this talk about MS glow in the dark glitter. Of course we had to get some, bad thing was it was 20% off at M's this week and couldn't use my 50% coupon. I wasn't going to get it because of that but...my 9 yr old is a total enabler and was begging that we neeeeeeded it! LOL. I love the glitter. Only bad thing is, can't figure out how to get it to photograph well glowing in the dark.


RECIPE:

**
This is an A7 slider card

**
Gypsy Wandering used and the Gypsy

**
Pumpkin sized 5.27 x 9.50. Flipped, grouped and welded 1 pumpkin and then used hide/contour for the face. Cut this 2x and in 2 colors--orange and yellow textured paper.

**
Used one of my CM circle cutting templates to draw a part circle at top of pumpkin and cut the top/stem part off on the orange paper.

**
Cut yellow strip of paper to fit inside of pumpkin for slider and then glued pumpkin top onto the yellow slider card. Inked stem with MS green chalk ink. Inked yellow paper with Tim Holtz distress ink in mustard seed. Then, inked outside edge of yellow card with distress ink in walnut stain. Dried lightly with heat gun. Stamped "trick or treat with $1 rubber stamp from M's in staz-on in black. Colored in the candy with CM distress ink and fantastix.

**
With scotch quick dry, glued yellow welded pumpkin together from the inside and then glued yellow pumpkin back to orange pumpkin back.

**
Now all you have is an open orange and yellow pumpkin "flap." Time to make the pocket for the card to slide into. Just run a fine bead of scotch quick dry on outside edges of the back of the orange and press onto the yellow paper. DON'T glue the top of the pumpkins together.LOL, Then I used a Tsuniko sponge applicator and applied Tim Holtz distress ink in Spiced Pumpkin to the outside of the orange paper and the top of the pumpkin.

**
Now, is where I applied the glowing glitter to the face features. I didn't do a very clean job of it but oh well! LoL I used scotch quick dry glue and just glued inside each face feature (one at a time) and quicky sprinkled the glitter on and pressed in. I applied heat gun briefly. didn't like the thickness of the glitter, so I repeated steps above one more time. It does glow really nicely in the dark !

**
Applied some CM candy stickers and some other stickers I had for a while to the top of the pumpkin. Outlined the outside of face features in black ink.

Regrets on this project: I should have outlined the pumpkin features in black ink before applying glitter. Maybe should've only done one layer of the glitter. Should've used more candy stickers.

August 24, 2010

Is Fall here yet? Good Gravy!!! It's been with the heat index 107 in OK and I'm ready for Fall! LOL

Here is a non-cricut/paper piecing Halloween Card. My 9 yr old had the idea so I helped her go with the thought!

*A2 card
*Black jack-o-lantern paper is by and was 2 sided Creative Imaginations/Danielle Johnson
*Purple and green paper was from H/L and I think Paper Studio
*Ribbon is sheer and from H/L
INSIDE:
*Paper is the reverse side of paper
*Stickers inside ?can't remember
*My daughter inked the inside of the card with Tim Holtz
distress ink pad in Orange Marmalade, Tea Dye and Peeled Paint


August 2, 2010

Well, it is hot, HoT hOT her in OK at 105. So ready for Fall and a cool breeze! Thinking about it got me in the mood to do Halloween cards.

Front
Inside
Ingredients:
5 x 7 premade white card. Used Gypsy, Cricut and WIMG for the sign (3.25), fence (3.25), PDDU for ghost(2.50) tree(4.50) and pumpkin (at 5.5), Doodlecharm for the spider (.90)

Papers--CM Blue with stars, Paper Studio green, Bazzil Golden yellow for moon and browns for fence, tree, sign & pumpkin. Inside card the jack-o-lantern paper is Creative Imaginations.
I cut and glued CM blue start paper down, then used a fiskars zigzag tearing tool to tear the green for the grass. Glued that down. With a black pen, I detailed lines onto the tree & fence. Then used colorbox chalk inks in dk browns and chestnut and beige to do distressing. For the moon, I used MS chalk ink in orange to add some extra color.

Can I tell you how many times I had to cut the blooming ghost
4 TIMES!! Somehow I kept washing my hands because I would somehow get black ink on the ghost. I couldn't figure out where the black ink was coming from. So, I glued one ghost down and it had black ink on it. Rather than pull it off with UNDO, I decided to leave it there and go for a shadow effect and apply another ghost on top with pop dots.

Inside the card: I cut the cute Jack-o-Lantern paper and glued down. Then I distressed the brown sign and glued onto the black sign shadow. Stamped "BOO" with black Stampabilities ink and a rubber stamp. The pumpkin was cut out 3 times--once with all details in orange, next in black and used hide/contour on Gypsy to hide the features. Then in green with hide/contour feature. Orange glued onto the black and then cut the green stem and leaves off and placed on top of pumpkin.


Related Posts Plugin for WordPress, Blogger...