April 12, 2011

Challenges: Mojo Monday, Cooking With Cricut, Cricut Cardz, FCCB

Hey All! First of all, apologies that my blog looks ugly! It seems photobucket has had problems and are doing maintenance and that is where my blog background and other images are stored. Hopefully it will look pretty soon!

~~CHALLENGES~~(1) Mojo Monday 186, (2) Cooking With Cricut--Bunny Hop Challenge,
(3) Cricut Cardz Challenge #69 and (4) Fantabulous Cricut Challenge Blog

I went off this sketch for Mojo Monday and then used this sketch for the other 3 challenges too.


MoJo Monday (Week 186 sketch)
FCCB (Create project using the three colors pink, green & yellow. )
Cricut Cardz Challenge #69(Create a card, LO or craft project for Easter)
Cooking With Cricut Bunny Hop (Easter Related Project)

Details: 5x7 card, plaid paper from M's, yellow/white twine, MS loop punch, white, pink, green, yellow cardstock, blue sky paper from CM, white organza ribbon from H/L, stamps from My Pink Stamper (only used "Have the Hoppiest" and blocked off the birthday word) and the word Easter was from a Studio G stamp from M's. Staz-on black dye ink.

Carts: Nate's ABC's for rabbit cut at 2.25, Give A Hoot for tree cut at 2.25, sun at 1" from Simply Charmed, scalloped circle and inner circle cut at 3 and 2.75 from Lacy Labels.

Donya

April 11, 2011

Peachy Keen Sketch Challenge & Cooking with Cricut April Showers

Hello everyone! Sorry I've been MIA a few days. Been trying to get caught up on stuff and finished my flower beds.

Thanks to all of you who became followers and don't forget to leave a comment for the blog candy I will be drawing for Thursday 14th.
****************************************************************************

I decided to do my first Peachy Keen Stamp Challenge (per the sketch below) and this was my 2nd
Cooking With Cricut Challenge (April Showers project using a cricut cut and having something to do with rain, water)

Here is the sketch from Peachy Keen:


Here is my sketch interpretation:


Inside Card

Details:
Card size is 5x9, Squares cut with CM punches. Paper is Bo Bunny (using both sides--a dot and a swirly solid), umbrella print paper is from H/L. Staz-On black dye ink,

Peachy Keen face stamps-- PK-500 Snow Cuties Face Assortment on the umbrella & PK-450 Wide Eyed Kids Face Assortment for sun inside card.

The Sentiment inside is from Emma at My Creative Time.(Turn That Frown Upside Down Stamp set) "You are my Sunshine"

Sentiment on front "Just Add Water" is from the computer/printer in Minya Nouvelle font.

Carts: Umbrella 1" EDPD, Rain Boots 1" Nates ABC's.

April 8, 2011

Recipe-Cake Pops

Happy Friday Everyone! Wowsers! Thank you thank you everyone…I’m to 98 followers. Did all of you sign up for the $15 gift card I will probably be drawing for next week?

So, what was I doing on Thursday? Not crafting LOL I had a busy day of buying flowers, starting to do the flower beds. Yeaaaah!!

If I get my yard work done on Friday early, I’ll post a project. If not, it will be Saturday.

OK, so my new bad vice is getting the occasional “Tiramisu” cake pop at Starbucks. It has like 180 calories but I get my little fix. LOL I found this recipe and tried it today and……they are AWESOME!! Thought I’d share with you all.

Cake Pops (similar to Starbucks)

Make a cake prepared from a box mix (per directions) or from your own favorite recipe. When the cake is cool, break it into small pieces, toss it into the food processor to make crumbs of it. If you do not have a food processor, break the cake up by hand into a large bowl. Make the pieces as small as you can.

Add about 1/2 cup of homemade frosting or about half of a standard size can of prepared frosting to the crumbled cake. Mix the cake and frosting by hand, as you would meatloaf. When the mixture is well combined, use it to make small balls of the "dough," similar to meatballs. Place them on a waxed paper-lined cookie sheet.

Melt a small amount (just to coat lollipop sticks), of candy melts almond bark or flavored chips. Dip each lollipop stick into the melted coating so that about 1/4 to 1/2 an inch of the end of the stick is coated. Then, insert a stick into each cake ball. This will help secure the stick to the ball, making it easier to coat them later.

Place the cake pops in the freezer for about 15 minutes, allowing the coating on the stick to harden and the cake balls to become firm. Melt more of the candy coating and dip each cake pop into it, twisting and moving the pop so that the melted candy coats as much of the cake as possible,
stand the sticks in a sheet of Styrofoam so that the cake balls retain their round shape. Otherwise, you can set them back onto the waxed paper.

To make tiramisu cake pops

like those at Starbucks, make a white cake per the box directions BUT...replace 1/4 cup of the liquid (water) called for per the box directions with strong brewed coffee PLUS add a teaspoon of instant coffee granules. Bake the cake, cool, crumble and mix frosting in as mentioned above. Continue with all the steps mentioned above.

BUT...to the melted chocolate mixture do this...

Combine a few drops of vanilla and coffee flavored liqueur to the melted chocolate candy dipping mixture. After dipping the cake pops into the coating, top each one with a chocolate covered coffee bean.

April 7, 2011

Stuff for Mother's Day

Hello Everyone!

So, Mother's Day is a month away and I'm thinking of what to create. I got to searching quotes etc for doing cards. Thought I would share what I found. Feel free to copy or use for your projects and just give credit to the author of the quote. :)
Have a Good Day!

********************************************************

"God could not be everywhere and therefore he made mothers." -Jewish proverb

"The heart of a mother is a deep abyss at the bottom of which you will always find forgiveness." -Honore de Balzac

"When you are a mother, you are never really alone in your thoughts. A mother always has to think twice, once for herself and once for her child." -Sophia Loren

"Mothers hold their children's hands for a short while, but their hearts forever." -Anonymous

Advertisement

"A mother is not a person to lean on, but a person to make leaning unnecessary." -Dorothy Canfield Fisher

"Motherhood is priced; Of God, at price no man may dare/To lessen or misunderstand." -Helen Hunt Jackson

"The moment a child is born, the mother is also born." -Rajneesh

"A mother is a person who seeing there are only four pieces of pie for five people, promptly announces she never did care for pie." -Tenneva Jordan

"No matter how old a mother is, she watches her middle-aged children for signs of improvement." -Florida Scott-Maxwell

"We never know the love of the parent until we become parents ourselves." -Henry Ward Beecher

"Never marry a man who hates his mother, because he'll end up hating you." -Jill Bennett

"Anyone who doesn't miss the past never had a mother." -Gregory Nunn

"Of all the rights of women, the greatest is to be a mother." -Lin Yutang

"As is the mother, so is her daughter." -Ezekiel 16:44

"Men are what their mothers made them." -Ralph Waldo Emerson


April 5, 2011

Blog Award

Wow! I am so honored to receive another blog award in a month! All of you know that when you are juggling home and work life, trying to do daily chores AND find time for you to be creative, it IS hard. I have genuinely tried the last month to get my blog rolling full steam and to let all of you see how much I love what I do. These awards show me that maybe, I'm doing something right. LOL

So....a HUGE thank you to Emily at Cool Cricut Creations for her generosity in giving me this award. Please go visit her blog. She does some creative things!


Here are the rules for this award:
1. Thank the person who sent it to you!
2. Tell us 7 things about yourself.
3. Reward this to 15 bloggers.

**7 Things about myself**

1) I love baseball--my favorite game ever to see was at Wrigley field when the Cubs played the Mets.
2) I'm a a sucker for The Young and the Restless
3) I've been deep sea fishing before and I loved it!
4) My all time favorite desert is tiramisu
5) It kind of freaks me out I will be 45 this year
6) Cats are my favorite animal
7) I started out majoring in Accounting at OSU and changed my major
my junior year because I hated it. I have a Bachelors in Marketing and
a minor in Accounting.

I have recently found many new blogs to follow, and thought I would share some of those with you! Here are 15 well deserving blogs:


1) Mistyrose at http://sweetmagnoliarose.blogspot
2) Lissi at http://littledetails-lissi.blogspot.com/
3) Erlinda at www.stampinwitheerlinda.blogspot.com
4) http://4goofballs.blogspot.com
5) Terri at http://myneed2craft.blogspot.com/
6) Sharon at http://inthebigbluehouse.blogspot.com
7) Rae at http://.wahoocrafts.blogspot.com
8) http://katieoscreations.blogspot.com
9) Marie at http://craftelicious.blogspot.com/
10) Tosha at http://gold-treasures.blogspot.com/
11) Cathryn at http://inthepinkcathryn.blogspot.com/
12) Kimberly at http://canadiancraftcorner.blogspot.com/
13) http://scrapperinthemaking.blogspot.com/
14) Joanna at http://peacelovestamp.blogspot.com/
15) Minta at http://mintascreations.blogspot.com

Thank you Amy and congrats to these 15 terrific blog award recipients :)


April 4, 2011

Challenge: Cricut Cardz #68

Hello! I entered the below card for the Cricut Cardz Challenge #68, that ends Tues 5th. The challenge was to create a card using any cart for a house, use a touch of lace and a flourish and to use any colors you like.

Details: 5x7 premade white card base from H/L. Bo Bunny Powder Blue back to back paper for the sky. Green sticker paper for grass from CM. Green lace for grass from H/L. All other papers are either Bazzil or from H/L.

Carts: Kates ABC's for house, Paper Pups for clouds, (using hide/contour on gypsy to cut 2x, in white, then in blue) Simply Charmed for the sun, Give a Hoot for the tree, fence from Heritage, flower tops from Walk in My Garden, Grass ?? cart (used grass for the flower petals) red bird I think was one I had laying around and cut from Winter Frolic.

For the house from Kate's, I "hid" the round window and instead cut a flourish above the door from Gypsy Wanderings. (I think, now I'm not sure LOL)

House--Kate's Lace-- used for the grass Flourish--above the door from GW


April 3, 2011

Challenge: Fantabulous Cricut-- Looks Like Spring #53

The challenge this week at Fantabulous Cricut is "Looks Like Spring" (Any springtime project).

Here is a 5x7 card that I did. I thought it appropriate because the brown background paper says "Spring has Sprung" with flowers and bicycles on it.

Details: Double sided paper from My little yellow bicycle "Spring." That was used for everything on card but the robin's egg blue card base and that was Core'dinations. White organza ribbon from H/L. Pearls from M's. Popdotted the brown print paper and the flower.

Carts: Gypsy Wandering for welded postage stamp card base and all card layers. Kate's ABC's for the flower, cut at 2.85.


Challenge: Cooking with Cricut--C 23--Funny Quote, Saying or Pun

Good Morning Everyone! Boy, my muscles ache. On Saturday, I decided to tear some bushes out of our flower beds (lot of work) I guess I used some muscles I haven't used in a while! LOL

First off, don't forget to sign up for my "100 followers blog candy".

***Next, there is some AWESOME blog candy over at Cooking with Cricut for hitting 1600 followers.***

So speaking of Cooking with Cricut's blog, they have a challenge in honor of April Fool's Day, share your favorite funny, quote or punny on a cricut project.

Here is my card for the challenge: C23


Details:
5x7 card. tan scalloped mat cut at 4.75 x 6.75, brown animal print paper cut with a decorative cutting edge trimmer at Denim rectangle cut at 4.5 x 6 4 3/8 x 1 3/4, white cardstock with MS punch for eyelet edges, Red gingham cut at 3 3/4 x 4, then used some fiskars scissors for the green grass and hand cut a wavy edge in sky paper. Finished off with brown twine and a yellow button for the sky. Added the red wording --at .75, cut 2x and layered for some depth.

Inside card was just the papers cut in rectangles. Used black Staz-On Dye black ink and a saying from M's.

Cart: Horse is CAC at 2.75, the tan scalloped cardstock was cut with Gypsy Wanderings


April 2, 2011

Thursday Throwback Challenge

Happy Weekend Everyone!

So, this is my FIRST official challenge I have ever entered. And, believe it or not, it was hard LOL

This is a Cricut-less/ Sketch challenge with Emma at Creative Time for Me. You could use punches but no Cricut.


Details:
* Premade white cardstock card base from M's, A7. (suppose to be 5x7 and it is only 5x6.5...go figure)

* Paper--just picked up from the LSS yesterday. It is We R Memory Keepers and it is called "Peeps" (appropriate huh, and who doesn't love a peep?) I used the "Easter Bunny and Easter Bouquet papers." It is a stinkin' Cute line of paper!! Pink dot paper is Bazzil. White cardstock for trim is Core'dinations.

* Inside sentiment was the same paper line but the Easter Tags

* Organza ribbon from Hobby Lobby, used my computer and the Minya Nouvelle font for sentiment that was printed on white cardstock and cut out. Used Fiskars scissors to cut the Bazzil green cardstock into a tag for sentiment. The pink felt "Peep" shape was from a pack of shapes on the Easter aisle at Hobby Lobby for $1.99 and 50% off that. I bought it because it reminded me of a peep. Popdots were used on the Green floral mat, the green tag for the sentiment and the inside sentiment. MS "Loop" punch for the white cardstock trim.

*Sizes: Pink Dot cut at 4.75 x 6.25, Pink Rabbit cut at 3 x 4.75, Green floral cut at 3.25 x 4


March 31, 2011

Hello!

So, I just got done watching Robyn at My Pink Stampers video on the new Expression 2. It is VERY cool! Repeat after me...I do not need it...I do not need it!! LOL It evidentally has some preloaded carts on it and I'm curious to get a look at those handbooks.

So, I never have entered any challenges before so I thought I would start.
Maybe some of you haven't done this before either. I'm going to try the challenge at Fantabulous Cricut, where the theme for this week is to create a project using any spring time theme. There must be a "Cricut" image the project. Challenges start on a Monday and have to be finished/posted the following Sunday evening. Then, they announce the winner on Wednesday.

Also, I noticed a common theme for requests/posts(see the posts for my blog candy) to see how to use your heat tool. I'll be honest and have only used it one time and it was used to dry some white puffy paint on a bowl I cut from FMK so it would look like whipped cream. I have embossing powders etc and just have never used it. So, you all have inspired me to try something new. I'll tackle that soon.LOL

Have a good day everyone :)


March 28, 2011

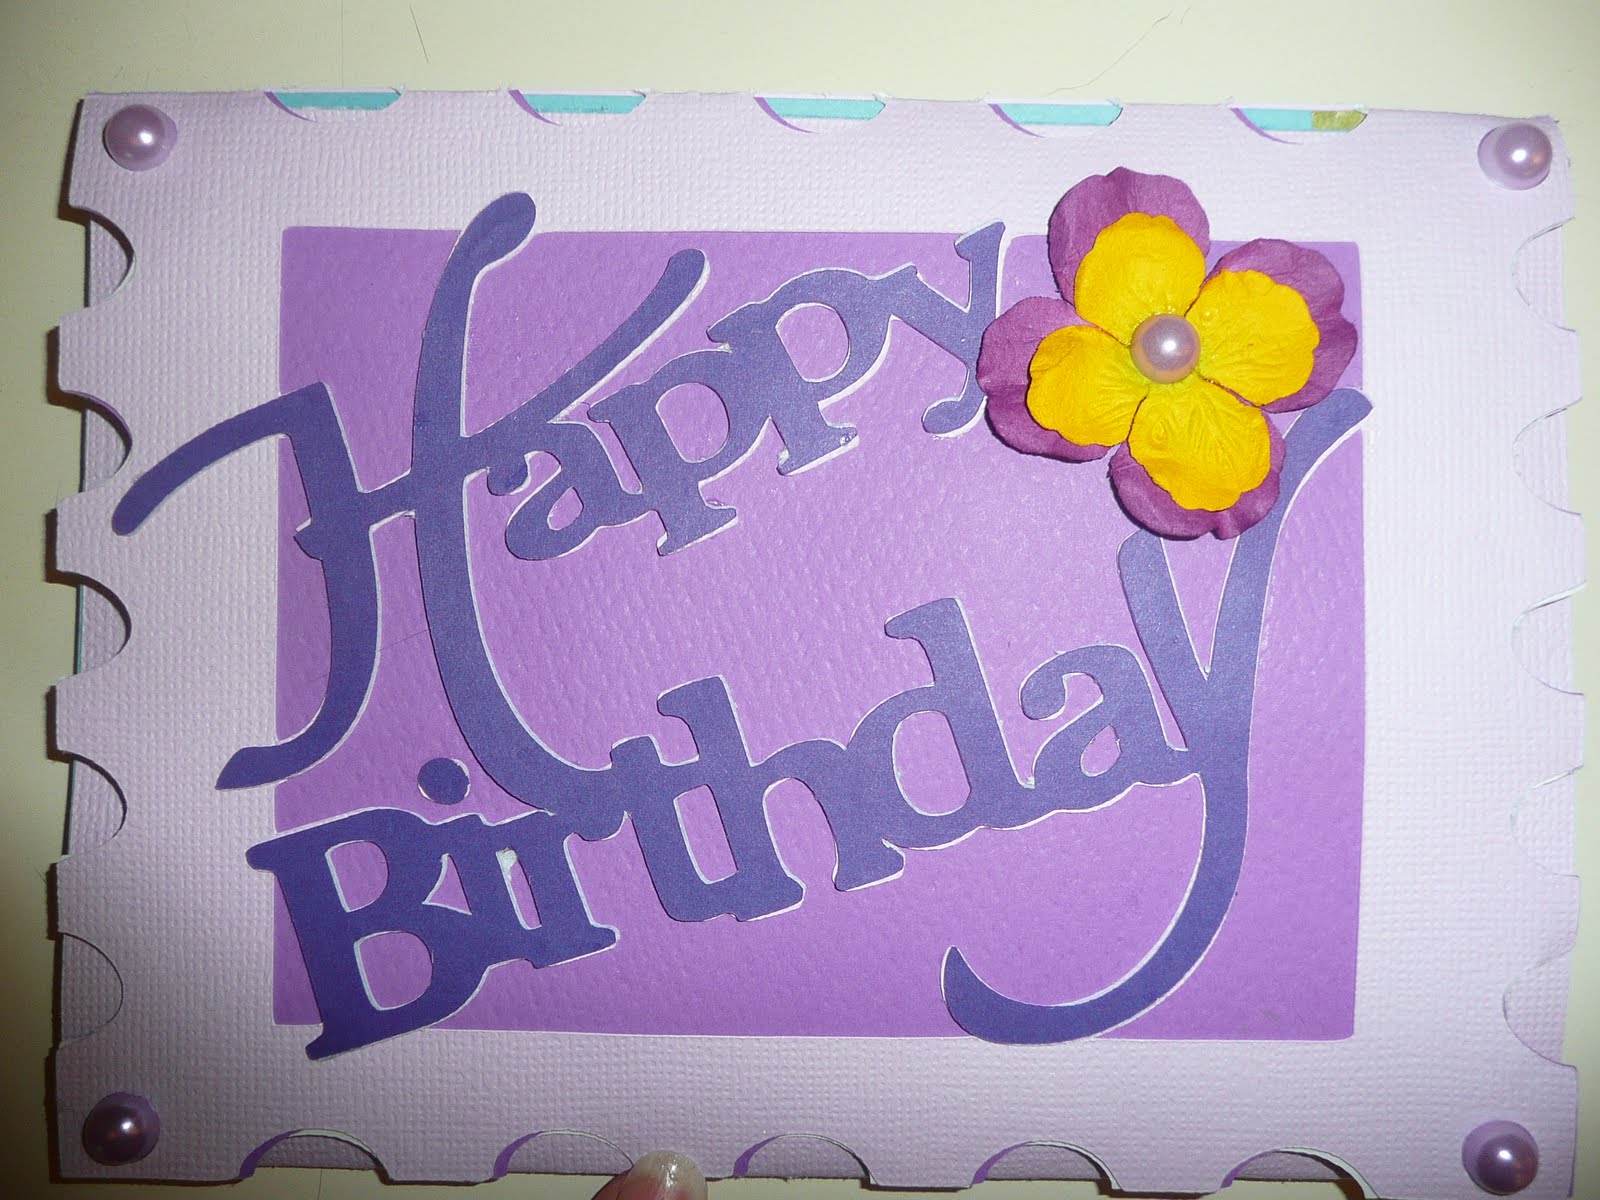
Birthday Card

Hello everyone. Good Gravy! I cannot believe in less than a week I went from 42 followers to 74--WOWSERS!! Thank you so much everyone and I hope I can live up to everyones creative expectations :)

I mentioned in previous posts I had a lot of birthdays in March. Last week you saw the picture frame card I did from my 3 yr old son for my MIL's birthday. I was bad and didn't do one from my hubbie and I.

But my 9 yr old wanted to do one. She knows my MIL likes birds and the color purple. So, she picked out the papers and went through a few of the cricut books and tol me what she wanted for a picture.

Then, she tells me she wants a "long fold up card!" I have never ventured out of my box to do anything like that. So I got my gypsy and my favorite card card--Gypsy Wanderings and started trying to figure it out. LOL ~~~~~~~~~~~~~~~~~~~~~~~~~~~~~~~~~~~~~~~~~~~~~~~~~~~~~~~

Go take a look at Sheila at She's a Sassy Lady's video and this is what started our inspiration for a window card with a phrase inside. I'm sure there were easier and quicker ways to do it but it took me a bit to get the words "Happy Birthday" positioned just right inside the frame. And, even though the words WERE already welded together in Gypsy Wandering, I STILL had to "weld the welded phrase" to the frame so it would cut the way I wanted. That meant resizing and resizing and nudging and stretching. Hopefully all this makes since by seeing a little visual.

So, first I did the postage stamp frame from the GW cart at 5x7. Then I took another rectangle frame cut from GW at 5x7 and used hide/contour for the inside frame part so it wouldn't cut as a frame. Then I duplicated that. Then, I nudged all of those shapes together, grouped and welded. After that, I worked on my Happy Birthday phrase to weld as much of the wording edges as possible to the inside frame. Then, I grouped/welded the phrase to the postage stamp frame. All was cut in one shot in lavender paper.

After that, I copied the phrase and pasted to a blank layer so I could cut that in darker purple (and to give some thickness to the wording. I did that 2x) and there are 3 layers to the phrase "Happy Birthday." The blue for the sky was cut as 2 welded 5x7 cuts (the postage stamp card cut was unwelded)


Carts Used & Size:

*Gypsy Wandering (Card Base with frame, the words Happy Birthday (5.62 x 9.39), all extra card mats in the various colors) All card bases at 5x7.

*50 States--for the Robin--cut at 1.25
*Paper Pups--Clouds at .75 and .90, they are double layered clouds so I did hide/contour for the inside part, then hide/contour for the outside part so I could cut on white, then blue paper.
*Give A Hoot--Tree I think was 5" tall
*Walk in My Garden--All flowers and cut at 1" and the sign, cut at 2"
*Life's A Beach--White Chair and cut at 1.50, the welded word "Relax" was also LAB but the blackout/shadow feature and then I cut the word off the bottom of the chair.

Other Details:
Purple cardstock was DCWV and the Blue for sky was Bazzil, Green for grass was sticker paper I've had fooooorrreever from CM. I used Distress ink pad and ink applicators to shade the robin. The lilac pearls are from Michael's $1 bin and the flower on front was Prima, with another pearl glued down in the middle. I used my ATG and scotch quick dry glue. For the grass, I used a CM tearing tool and tore the green sticker paper's edges.

Can I say that cutting those flowers at 1inch was a bear to put together LOL. My MIL LOVED it and my daughter was so proud of her design work. LOL


March 26, 2011

Toy Story Birthday Card--Buzz

Ok, so here is birthday card #2 using Toy Story. My 9 yr old daughter helped me pick out the papers and figure out how to layer them. I was kinda stumped what to do for the Buzz card. LOL Thank you to my girly- girl!

Sizes:
~ Card Base is 7x14 (folded 7x7), green frame is 6.75 x 6.75, blue cloud paper is 6x6
Blue Star paper is 5.5x5.5
~Inside left scallop oval was done with real dial off and like 6 wide and 3 high,
~ Inside right scallop was done bigger, with real dial off and like 8 wide and 4 high
*****Can't remember for sure what sizes I did the oval scallops. But when I sized my "Happy Birthday, I made sure it would fit inside the oval.
~ "Happy Birthday" was done at 2 and the "3rd" was done at 2.5


Carts Used and Details:
~ Disney Toy Story, Buzz at 3"
~ Gypsy Wandering for card base and all Layers and scallop circles inside
~ EK Success scalloped punch for tag on front
~Computer, white cardstock and Minya Nouvelle font
for sayings
~ Gypsy Wanderings for "Happy Birthday" phrase
~Nates ABC's for the "Number 3"
~Outside Message "Hello Space Ranger"
~Inside Message "Time to Blast Off for Adventure"


March 25, 2011

Toy Story Birthday Card--Woody

Hello Everyone and again..thanks to all who have recently joined my blog! :) I truly appreciate it!

So, Saturday is the big Toy Story family Bday party for my 3 yr old. (his bday was Thurs.)

I asked him what kind of Toy Story card he wanted and he said "Woody and Buzz, BiiiiiiGGG card!!" LOL

So, Mama made him some big cards LOL I made a card from Mommy & Daddy that was Woody and one from his sister (she helped me on it) that was Buzz. The buzz card will be posted tomorrow.

Sizes: Card Base 8x8--I told ya it was big!!
~Layers were 7.5x7.5 for cow print, 6.85 x 6.85 for blue cloud print.
~The fence post/frame I took off the real dial size and it was like 7 high.
~Woody was at 3.5.
~Inside alphabet was at 1.5, horseshoes were at 1.25 (the one outside)and 2.5(the one inside) ~The number 3 was at 2.75"

Carts and Other Details:
~Card Base was from Gypsy Wandering, as was the scalloped frame cuts. The inside cow print scallop and the cloud scallop were the "negatives" from the front of the card cuts I did.
~Toy Story for Woody
~Outside Message says "Reach for the Sky"
~Inside wording was welded using Nates ABC's
~Fence was from PDDU and then after making the fence BIG for the frame on the front, I cut the posts apart. I ran the fence posts through the cuttlebug using a Sizzix woodgrain embossing folder
~Horseshoe was from PDDU, used ink to detail the holes
~Computer generated messages using Minya Nouvelle font
~EK Success scalloped shape punch for the messages


March 24, 2011

Window Frame Card

Ok, so I said yesterday I had a bunch of cards to do. Well, I put my 3 yr old to work today--Happy birthday to my little man today. I got some 12 x 12 archival scrapbooking canvas at H/L and cut a 5x7 piece and gave him some oil pastels and told him to color a picture.

First of all, this would've been the pefect opportunity to do my first video huh? LOL
Sorry no detailed gypsy pics. I always enjoy those because I'm sure I'm not the only visual learner!!

I got my gypsy and went to GW and used the frames. I sized at 4 1/4 x 5.5 and duplicated, grouped and welded together. On the side that was the back of the card, I used hide/contour to hide the "inside frame" cutout. All that was cut.

Then, I cut just the one frame side 2 additional times for some thickness when I glued everything together.

Then, I used just the same frame side that I just did the hide/contour on (the back side of card cut) and put a piece of the clear plastic cricut clamshell packaging on the mat. I was lazy and didn't put my deep cut blade/housing in. So, turned blade to 6, pressure max and speed max. I had to multi cut it 2 additional times but it worked.

Now, for the inside patterned paper. I used the same frame cut again but used hide/contour for the inside part for both before grouping/welding together. I cut the birdhouse paper out. Then, just used one side of the frame with the inside hide/contoured and cut 1x with the floral/vine paper.

Then, went to Winter Frolic and cut the tree branch 2x in brown, size at 3". I had to trim the shadow of the bird & nest off since hide/contour wouldn't work for this cut. Then, used the "Happy Birthday" phrase on GW sized at 2 in red.

The bird is from Animal Kingdom and cut at 1". The base was yellow, the top layer (without beek or legs) was in a tan. I used Tim Holtz distress ink pads & MS chalk inks and applicators to highlight the belly and wings--colors used were MS cream, walnut stain, weathered wood, and honey.

Ok, now for card base. Ran through cuttlebug and use the sizzix/Tim Holtz tree folder. Then inked entire card in walnut stain distress ink pad.

Remember the 2 extra frame layers I cut for thickness? I glued those inside the card base to give the frame part extra thickness. Then, I used my ATG to glue the cut piece of plastic inside the frame (like glass on a picture frame). To make sure things would stay in place, I used an embroidery needle and the natural bakers twine and 2 small red buttons to go completely through the plastic & 3 pieces of cardstock. I left ends long on top of the button so I could tie a bow. It was hard using the needle through all those thicknesses so I had to also use some needle nose pliers to pull through.

Ok, for the "art masterpiece" LOL I wanted it stiffer so I painted a thin layer of Modge Podge on both sides of the canvas. It took 30 min to dry. Then, I ran a layer of the ATG tape from the inside of the card on the plastic. Then, I thought "THAT WON'T HOLD" so I also used some of the zip dry on top. I placed the canvas down so it would show through the "plastic window."
I used some of those black butterfly clips around the edges of the card to hold the zipdry/layers together while it dried good.

An hour later I came back and glued the inside pieces of cardstock to the card, then glued down all the inside details.

I just got done with this card and it took me aaAAALLLllllllll morning!! First time I ever tackled anything like this. Who knows, there was probably an easier way to do this. It was a learning and creative thinking project. LOL

But my 3yr old is so happy his little artwork is made into a card. My Mother-in-law loves birds and nature so I think it all works.


March 23, 2011

Made By Momo Blog and my Random Daily Thoughts

WOW! Thank you everyone for joining my blog. I really do want to get myself more organized to do even more projects on here! I have to get viewing all your blogs on Momo's site and joining all your blogs too!
In case you didn't know, the "Made by Momo Blog"that I follow is graciously promoting on her site that blogs with less than 200 followers can link to her blog. She's doing an awesome giveaway too! THANKS to Momo! Check out her blog by clicking on her blinkie down below and to the left.
*************************************************************************


I have been busy today shopping and organizing things for my little man's 3rd birthday tomorrow. I just got done wrapping presents, ordered the Toy Story Cake and balloons for this Saturday's family party. Figured I'd do it all know since he's in his little pre-preschool program today. Hard to wrap presents for a 3 yr old boy and hide what your doing. LOL

So, imagine my surprise when I peeled only one strip of tape off a roll, found another roll of tape and peeled only one strip off that!! Hmmmm....I think my 9 yr old dd (aka the tape queen) got ahold of both my rolls of tape I use for scrapbooking. I had to finish wrapping presents using my ATG gun LOL.....Guess it's time to buy lots of tape....and a couple of rolls JUST for her! :)

Then, I have to make his birthday card, help my daughter make one for him and then do my MIL's birthday card from the kiddos. Hopefully I can post those on Thurs and Friday.

I want to try a Window card for my MIL. I bought some of this 12x12 canvas at H/L and am going to let my little guy fingerpaint or color with oil pastels on the canvas and then try to do a window frame card and cut the canvas like it was a painting and then cut the clear plastic cart clamshell packaging like a piece of glass and assemble a window frame card.

I feel like I need 2 extra hands today. LOL

March 21, 2011

Happy Monday

Hello everyone! Hope you had a good weekend. Wanted to share the birthday card my daughter and I did for my niece who is turning 12. We just mailed it off today. This is the card from her. :)

My daughter had the idea in her head and told me what she wanted so I helped her on my gypsy follow through with what was in her head. She picked out the papers and said these colors would be a "girls dream colors for an I-pod." LOL

Carts Used: Paisley (MP3 player), gypsy wandering, card layers, Nates ABC's for font
Sizes: Card Base 5.5x5.5, Card Layers--MPS 4", Font inside card 1.05 and shadow 1.15
Details: All paper is Creative Memories. Found a square card base (The black paper, I think we used LAB) and used hide/contour for the design on that and sized to 5.5x5.5.
The Plum cardstock was a square we cut at 5.25x5.25. The purple swirly paper was cut at 5x5 using a design in GW. I used a blade depth of 2, pressure high and speed high to cut since a thinner paper.

For the MPS player, we couldn't hide/contour on the gypsy all the parts we wanted to to recut it. So, we just cut everything in several different colors--grey, pink, black and purple and decided after that how she wanted her "Dream Ipod" to look. The music notes were also from Paisley and we cut at 2, 2.5 and then used MS Hematite glitter. We ran the notes through the Xyron "X" and then applied glitter and then the glossy accents. Also, used a white sakura pen and a ruler to add faux stitching.

The white scalloped trim was this cool pearlized thick cardstock I had. I used Lacy Labels to cut a scalloped 5x5 shape and then didn't want to use it. My daughter suggested to trim off the edges and glue to the back side of the plum paper. Pretty creative girl huh? LOL

Inside the card, the plum cardstock square was 5.25x5.25 and the purple swirly square was cut at 5x5. We welded the Nates letters together for both the lavender and the shadow in the purple. Again, used a white sakura pen and ruler to add faux white stitching. W.e used some lavender jewels and silver sticker stars from the $1 bin at M's


Related Posts Plugin for WordPress, Blogger...