March 1, 2011

From My Kitchen and Simply Charmed cuts

On the Cricut messageboard, there is a monthly RAK cut thread where each month, you can put in 5 cut requests from a cart and someone will RAK grant your wishes. I just got From My Kitchen 2 weeks ago and wanted to try my hand at doing some cuts for someone other than myself. So, i just finished up some cuts from these 2 carts.
(FMK)

The apron was probably my favorite to do. Lots of layers but fun to do. Lots of color options with it. The cuts below are 3 inch and 2 1/2 inch. I probably wouldn't try below 2 inches on this one.

The rolling pin is nice and simple and at 3, 2 1/2 and 2"

The mixing bowl is at 3" and I decided to try to use fabric puffy paint. I used the heat tool over it to get it to dry quicker. It looks really cool. We'll see how the puffy paint travels in a box :)

The mixers were fun. You cannot get good clean cuts on the beaters below 2 inches though. I decided to do the beaters and the decorative stuff in silver paper. The cuts below are 3, 2 1/2 and 2.

From Simply Charmed:

Popsicles are at 3, 2 1/2 and 2 inches. The biggest one, I did at 3 1/2 inches and used the Martha dripppy goo punch. The other was at 3". FYI, you can't use the drippy goo punch on this popsicle cut and have it look good below 3". I also did some of them with peachy keen stamps. I used the snow cuties and Princess faces.

The Sun is at 3 and 2". I did a couple with the snow cuties faces and just inked the smile before putting the glasses on.

The watermelon is at 3, 2 1/2, and 2 inches. Some I just stamped the face with the PK snow cuties stamp.


February 26, 2011

St. Patricks Day Card #2

Happy Weekend everyone!

Below is a 5x7 card. The leprechaun is done at 2.5 from Simply Charmed. The paper I got from the local scrapbook store. It was really different. One side was the green plaid and the other said "lucky" I took some green paper and use the MS loop punch. Pot of gold was cut 3x, twice in black and once in gold. I just layered the gold in between the two black pieces when adhering together. Then, went over the gold textured paper in a gold sakura pen to outline the coin shapes.

Inside the card says "Happy St. Patricks Day!"

February 25, 2011

St. Patricks day Card #1

Here is a card I did for St.Pats day. Sorry, don't know exact sizes since no gypsy.

This is a 5x7 card. My dd got the idea of putting rainbow ribbon at the top, so I went with that :)

The tree is from sweethearts (I think at 3")and I just improvised and cut out shamrocks in various sizes from PDDU(like .75, .85, 1) I put glossy accents on the shamrocks. The shamrock on the trunk has green stickles outlining it.

The pot of gold is from PDDU and I used a gold textured cardstock I got from H/L. I think these were cut at 1. I went over the top of the gold where the coins were with a gold pen.

The hat on the dog was from Simply Charmed (from the leprechaun) I think it was 2". I put a little glossy accents on the buckle of the hat.

The dog is from paper pups and was cut at 1.75. The grass was just a strip of green that I cut slits on the top of.

Inside I stamped "Feelin' Lucky?"


February 24, 2011

Well,my G. is getting a makeover

I just called PC customer service yesterday about my frozen Gypsy. Got the emailed Fedex return label today and it is already on a fedex truck. "Hopefully" it really only takes the 2 weeks they say it will. :) I will miss it. So hard to go back to the old fashioned way of cutting out stuff. Never realized how lazy I was LOL

Hindsight is 20/20 and maybe I had a tuition thing going on because I have been using the G. a lot the last 2 weeks to cut out Easter and St Pats and Springy stuff. Glad I did because I have a small stockpile of cuts. Also glad I had a chance to back up on the computer all my gypsy files cause I put a lot of work in those.

I plan on posting a couple of St. Pats cards for tomorrow/weekend.

February 23, 2011

Gypsy Updates--don't do it!

Ii just wanted to warn all of you please do not try to do your gypsy updates. There are problems with it. Bottom line is it messed up my Gypsy (it was my Mothers Day present last yr) and it was frozen at "loading" and wouldn't hard or soft reset. So, it has to go back Darren in customer service says that I will be without it 3 weeks....we'll see how long it takes... :(

This is how it all happened. I got car decals on Jan 15th ish. I tried for weeks to get it to load on my Gypsy. I tried everything and it wouldn't load. I called customer service on the 2/11 and they thought a bad cart. So I got cart #2 fedex yesterday. It wouldn't load. Earlier Tuesday (yesterday) morning I did a cricut update. It said I was at 2:06/2:14. So after cart #2 wouldn't load I did the troubleshooting and tried to update. Nothing...then decided to reformat my gypsy (go to troubleshooting and answer the questions YES, No, No, No and Yes (to erase everthing on your G). Well my G. got stuck/frozen after 2 hrs so I shut everything down. This morning I turned on my G. to start reformatting again and my gypsy was frozen on the "loading" screen.

Had I KNOWN there were problems with cricut sync, I never would've tried to update and do all this. It/PC messed up my G. Even Darren in customer service said don't blame myself but the cricut update attempts when it wasn't working right did probably freeze up my G.

February 14, 2011

Happy Valentine's Day! I thought we'd be going out to dinner tonight. It seems my husband over the weekend was having molar pain and sure enough, today found out has to have a root canal. Couldn't have it today since to swollen. So, we'll be taking a rain check on that and eating something nice, romantic and mushy tonight :O LOL He did come home with some roses so that always works....right?

Since I'm homeroom Mom, I'll be going up to my DD school in a bit with my wild man for her Valentine's Party.

Here is a card I did to give to my In-laws yesterday. It is a 5x7 card, I used pink BoBunny paper, and Martha 4x6 paperpad (one paper says "love" and the other has hearts.)

The shoes are from the Sweethearts cart and I think I cut them at 2.75 with expression and gypsy. I did 3 layers on the heart on the shoe, glued together and then ran through the Xyron , did MS red glitter and glossy accents. {I LOVE glossy accents!!} Then gently glued on the high heel when dry. I outlined the man's shoe with a fine point CM brown pen and then did brown ink around the edges. The pink show was edged with pink ink, as were all edges of the papers. The inside message of the card was done at 3.


Hope you all enjoy the day!!
Oh, almost forgot....if you looked below you saw the golfer I did with car accents. We were going to make it into a Bday card for my FIL. Well, my DD took it upon herself to do the below card all by herself. I was quite proud of her!! :) :) She used country life for the sun/grass. I showed her how to take the read dial size off on the gypsy (the chain link) and size the grass exactly to 6 wide and 4 high. Then we just cut an extra layer again for the darker green behind the sun. The golfer was car decals (see rest of details below) at 2.75 and the golf cart was at 2". Clouds were EDPD and then chalked.


February 12, 2011

Ok, it's Saturday and we are actually warming up in OK. The snow is sloooowwly melting. After 9 days of being out of school, my dd will be going back on V-day and my little man will go to his 2 days a week on Tues/Wed--YEAH!!!!! (Oh, sorry did I yell that? LOL)

So no card today but thought I'd play a little more with car decals. 4kids4 this is for you since you commented on my car decals V-day card how you thought you might want to buy it. :)

I finally decided I'd try to load on my gypsy and guess what...it won't load! I tried everything, troubleshooted my gypsy, reloaded stuff back on my gypsy, switched the cart, ran my stylus across the bars when trying to load, held the cart in, pulled the cart out a smidge, held the cart and cord up when trying to load. Tried for 2 days and probably 40x. So, I gotta call PC on Monday because I guess a bad cart. I know it's not the gypsy or linking cord because I successfully loaded Serenade, Sentimentals and Heritage today.

So, I had to re-learn how to cut the old fashioned way. Not having a hide/contour just stinks!


All these were cut at 2 3/4. Some I cut 3x to be able to cut out the details I wanted to glue together (again, no gypsy or hide/contour)

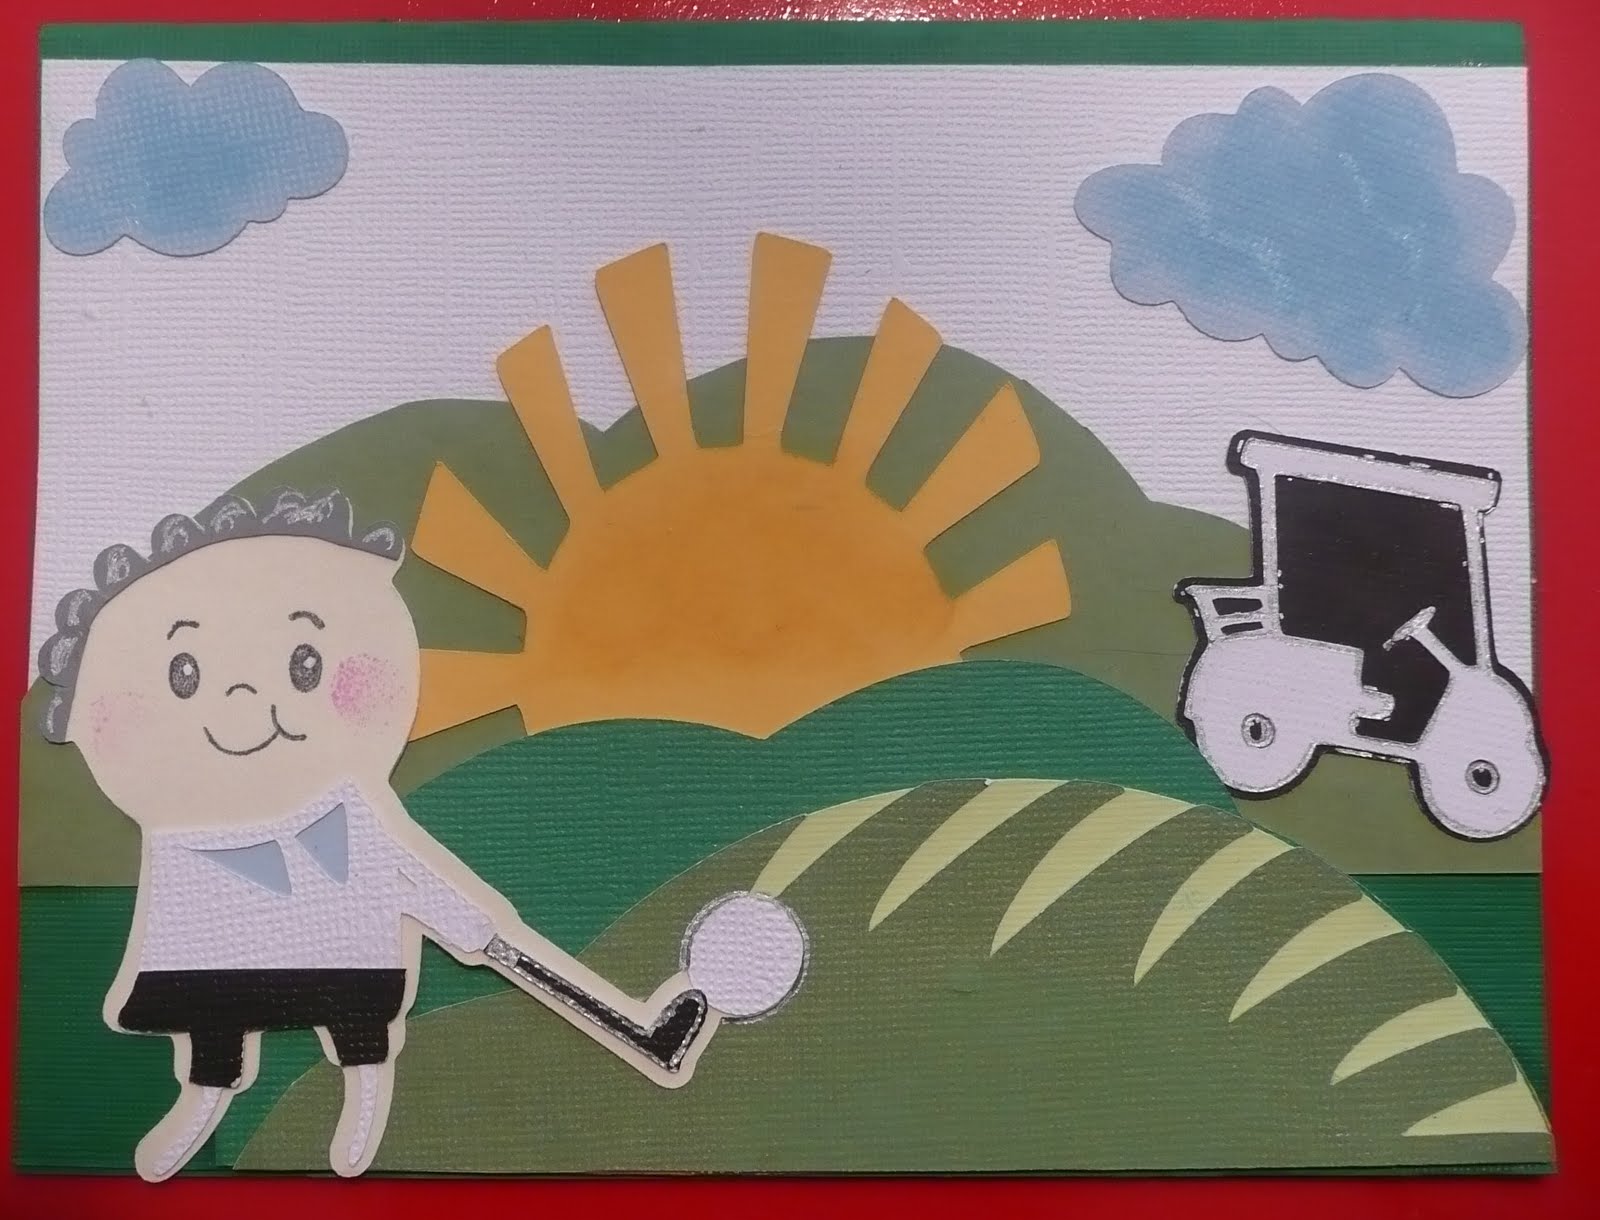
My FIL's Bday is tomorrow and DD doesn't like the eyes on the golfer. So, I cut the shift(blackout) on the golfer with a manilla folder for the flesh color. Then, the normal cut in white and black. Then the shift/blackout again in grey (only for hair). I cut just the hair out and glued on top of flesh color. From the neck down the white is the arms and clothes. I cut the head off the white layer so the "flesh" would be the face and did a peachy keen stamp. I took a scrap of blue and glued behind the white for the collar on the shirt. I then took the "normal" black cut and cut off for some pants and glued to the white. Does all that make sense? LOL

Now we have to figure out what to do for the card. Thinking of taking some blue for sky, cutting out clouds and doing the green hilly grass and sun from Country Life.


The eagle was tricky. This was at 2 1/4 and I cut the blackout/shift in grey. Then the normal in cream, gold and brown. Again had to just layer the parts I wanted to. Cream glued to grey, yellow beak and eyeball. Glued the cream surrounding eye part down. Then, glued brown layer.


The flag was at 2 1/4. Blackout/shift was white. I cut the stripe/flag part out in red and blue. The start is cut out so it makes for great extra stars. Glued the red stripes onto the solid white and then took just the blue star and glued down.


February 11, 2011

Valentines Card #3

Oh my...3 days of posts LOL Gotta love the scheduling feature on blogs :)

So this was a store pre-made 5x7 card. The white LOVE paper was something I picked up at Hobby Lobby for 10cents each last summer. The red cardstock is BoBunny from 2011, valentines. The red cardstock for the hearts is Bazzil. The hearts are from sweetheart, cut at??
After I cut I ran through the cuttlebug and used a sizzix Textured Impressions Embossing Folders 4PK - Love Set. Then, I gently separated the intricate cuts and intertwined the hearts and glued with scotch. Red mat (size??) got glued down and then I wrapped/taped the red sheer ribbon around the love paper and adhered the paper down. Tied the bow. The hearts got glued down last. Inside of card is blank because I may use this card for my anniversary card.


February 10, 2011

Valentines day card #2

Wow! Day 2 of posts! LOL
We got another 4 inches on Wednesday and STILL are snowed in (I haven't driven a car since Monday Jan 31st...can ya say I'm stir crazy!) because hubbie has to drive my SUV with 4 wheel drive to work.

So, here is another card. DD had this idea to give to her teacher because her teacher has a cat and dog. So....

I got car decals 2 weeks ago. I love Paper Pups with the simple layering and that is the main reason I got car decals. Very similar. I never wanted to use it for "car decals."
This is just me but the only thing I don't like about car decals is one eyeball is always smaller than the other. I know it's suppose to be that way. I just use the gypsy to hide/contour and will either draw on my own or use black flat accents for the eyes. I might try to use PK stamps too maybe...hmmmm....

So this was a store pre-made tan 4x6 card. I used car decals and cut the dog and cat at 2.5." The heart is from sweethearts and I think 1". The paper is Martha Stewart key and heart mat pad, and the heart punch is Martha. The twin is red/white from someone on ebay.

I don't remember the sizes I cut the mats. I ran the heart shape through the Xyron X and then used MS red glitter. Then, used glossy accents for the first time. I can tell I will be a BIG fan of glossy accents! I put the dog and cat together, glued down their eyes, drew on a black nose. I wanted the dog and cat facing a certain way so they could look like they were holding the heart so I turned and flipped one of them before cutting.

Glued down the red heart mat, then took twine and wrapped and taped to the tan printed mat and tied a bow. Then glued down on the red mat. Glued down the punched heart border and finally the dog and cat. After glossy accents dry (I put on thin so like 15 min) I glued it on top of their paws.

Inside the card was an EK success punch for the tag. Used a stamp from M's and some black stampin'up ink. Then glued down another MS heart border


February 9, 2011

Valentine's Day Card

Been a while I know. With an almost 3 yr old boy, I had such high hopes of being able to have time to do cards and update my blog regularly. He is into everything all the time...do any of you know the feeling? LOL

Being snowed in the last week, I've had time to work on my gypsy and actually cut some stuff out. Big sister has been home to entertain little man! We haven't had school in 7 days.
***********************************************************************

CARD

Here is a 5x7 card I made
I used the Martha Stewart breanch punch and 2 shades of pink, red and white cardstock to punch out a bunch of branches. Then, I used my computer and Microsoft Word to just type in random Valentine's Day words (using different fonts, etc. )and then copied and pasted/repeated those words on the entire page. Then, printed it off. I took my CM heart cutting system and cut the printed paper out.

I cut 2 different sizes of mats in pink and red (don't remember sizes) and glued down. Then, used my ATG to adhere down the printed paper heart. Then, took my scotch glue and started gluing down the leaf punches.


I had seen this poem once before and really liked it. So I found it, copied and pasted in Word and printed off on white cardstock. Cut that out and glued on some pink cardstock.
Nice and simple. I'm thinking of giving this to hubbie for Valentine's day.


My new carts

I had some Christmas money so have been getting some carts on ebay.
I recently got: Serendade, Sentimentals, Heritage, Boys will be boys, Freshly Picked, Car Decals and Nates ABC.

I wanted Sentimentals for the cool bee and hive. I wanted serenade because it had a table, Freshly picked because of the gnomes and gazebo, Car decals because it was just different and nates because it is cute and boy related. I have used all the carts except Nate and Boys. I have stuff laid out on the gypsy to cut for those. I Love love LOVE the Sentimental bees!

December 23, 2010

Merry Christmas to all of you...AND ME!!

Look what followed me home today.... :) Call it a hunch or intuition but I had that "feeling" I needed to go to one particular WalMart today. 3 weeks ago they had the Black Friday Expressions for $175. So I go in today and see 6 on a shelf for............................

$100!!!! So I finally got one for $108.57. Merry Christmas, Happy Holidays, Happy Hannakuh
to Everyone!


November 5, 2010

Geez! I haven't been updating my blog for over a month. That is so bad of me!!!!
Had lots going on...kiddos and us sick. Ethan had croup last weekend so he never got to experience his first Halloween trick or treating. That is some wicked stuff--my dd never got croup so we had no idea what was up...it developed really quick and it is just a freaky cough! After that, it has developed into an upper respiratory infection. So no school for him this week.

Been busy trying to get caught up on 3 scrapbooks and start on a new one for my niece for Christmas. I'm going to try to get new stuff up soon.

BUT...I did get my gypsy updated! (That was the most important thing, right?) I wanted TBBM so bad, now I just need to find a good deal on an expression to work better with it. I LOVE Smiley Cards too. And, I was really wanting a Christmas cart that had a window and door so I could experiment with using the clear plastic from cartridge clamshell to put on the back of a window.

Last thing is to Beth....I hope you are enjoying my birthday blog candy I sent you in September

September 19, 2010

******Birthday Blog Candy WINNER WiNNER winner******

Random.org number generator picked post 21. That winner is... and I will email you shortly for you to send me your mailing info. You'll have till Wednesday at 9:00 AM to respond to my email or I will unfortunately have to draw another winner.~~~ C*O*N*G*R*A*T*S!!!~~~
Beth said...

Happy birthday!! Great blog candy and thanks for the chance to win. :)

Baby.cowgirl88@yahoo.com


Blog Candy Drawing

Hello friends! Thank you for all the warm fuzzies and birthday wishes. I appreciate you stopping by and becoming a follower and your wonderful posts!

My 44th birthday was great! Got lots of fun scrapbooking stuff--Ott lite, gift cards, Lite Slumber Party and Simply Charmed. Best of all, got to spend it with family and my Mom made my favorite cake.

Never done this Random.org number generator so here goes. I will email the winner. There are 25 posts so...

September 18, 2010

Birthday Blog Candy

-----------------------------------------------------------------------------------------------
First of all let me say don't think I'm crazy that the date on this post says September 19th LOL. If you have a blog, you know that to keep a post "stickied" at the top of the page for a length of time, you have to change the post date to a far off into the future date. Just didn't want you to think you slept for the last 13 days and got no scrapbooking done LOL
-----------------------------------------------------------------------------------------------

**** I'm doing my first blog candy. It's for my birthday. Today is Sunday, September 5th and for the next 13 days you can sign up for my BIRTHDAY BLOG CANDY.****

**All you need to do is**

1)Become a follower
2)Leave a comment below this post before 12 pm midnight on 9/18/2010
3) You must be a follower of my blog and leave a message under this post with a way to contact you in order to win.

Ability to post comments will be turned off at midnight 9/18. I will try to be awake at 12:01 AM on 9/19/2010 to draw a winner. LOL If not then first thing Sunday morning when I wake up

Please leave an email/way for me to contact you. You will have 3 days to respond to my email with your address or I will unfortunately have to pick another winner. Winner will be chosen by random.org


Thank you for participating!

Above is the picture of everything: 1 package of 6 sheets of grungeboard, 1 MS drippy goo edge punch, 1 MS rain drop edge punch, 2 Tim Holtz Distress ink pads(in Barn Door and Forest Moss), 3 rolls of ribbon (3 ft on ea roll--Leaf, Christmas Tree and Happy Thanksgiving), 5 Studio G clear stamps, 2 K&C Company mat pads 4.75 x 6.75 (18 sheets each). This is almost a $40 blog candy.


September 13, 2010

I did a real simple Halloween card. My dd and I went to M's and she saw this stamp and "We had to have it." LOL

RECIPE:
**This is an A7 card
**The "ghouls" are cut at 3" using PDDU
**The inside of the card is kind of a patchwork design by using the CM square punch (biggest one) and just cutting squares from various papers. Then overlapping and gluing down to make it look like a picture frame with white space in the middle for the stamped message.
**Used Sakura white gel pen to add fake stitching. Inked edges of white cardstock for stamping with Orange Marmalade Distress ink.
**Rubber Stamp from M's and inkpad is black from Stampabilities. I just realized after stamping it that they glued the rubber on kinda crooked.
**Stickled black and silver on the girl monster, used MS orange flocking for the orange monster and a silver sakura pen for details on shoes etc. CM fine tip pens for the face features.

OUTSIDE of card. I was not feeling creative and I did the outside of the card last. I could not think of what to do on the outside. So, my dd said she knew just what to do. So I let her go with it. LOL She took grey chalk and lightly stamped entire outside of card with it. Then, took MS navy pigment ink pad (the eye shaped ones) and started to do fluffy clouds. She also took a distress ink pad (I think broken china) and put a little different color of blue in the sky. Finally, took Tim Holtz distress ink pad in peeled paint and did some swirls for grass.
Thanks to my creative girly girl!! LOL


So I heard all this talk about MS glow in the dark glitter. Of course we had to get some, bad thing was it was 20% off at M's this week and couldn't use my 50% coupon. I wasn't going to get it because of that but...my 9 yr old is a total enabler and was begging that we neeeeeeded it! LOL. I love the glitter. Only bad thing is, can't figure out how to get it to photograph well glowing in the dark.


RECIPE:

**
This is an A7 slider card

**
Gypsy Wandering used and the Gypsy

**
Pumpkin sized 5.27 x 9.50. Flipped, grouped and welded 1 pumpkin and then used hide/contour for the face. Cut this 2x and in 2 colors--orange and yellow textured paper.

**
Used one of my CM circle cutting templates to draw a part circle at top of pumpkin and cut the top/stem part off on the orange paper.

**
Cut yellow strip of paper to fit inside of pumpkin for slider and then glued pumpkin top onto the yellow slider card. Inked stem with MS green chalk ink. Inked yellow paper with Tim Holtz distress ink in mustard seed. Then, inked outside edge of yellow card with distress ink in walnut stain. Dried lightly with heat gun. Stamped "trick or treat with $1 rubber stamp from M's in staz-on in black. Colored in the candy with CM distress ink and fantastix.

**
With scotch quick dry, glued yellow welded pumpkin together from the inside and then glued yellow pumpkin back to orange pumpkin back.

**
Now all you have is an open orange and yellow pumpkin "flap." Time to make the pocket for the card to slide into. Just run a fine bead of scotch quick dry on outside edges of the back of the orange and press onto the yellow paper. DON'T glue the top of the pumpkins together.LOL, Then I used a Tsuniko sponge applicator and applied Tim Holtz distress ink in Spiced Pumpkin to the outside of the orange paper and the top of the pumpkin.

**
Now, is where I applied the glowing glitter to the face features. I didn't do a very clean job of it but oh well! LoL I used scotch quick dry glue and just glued inside each face feature (one at a time) and quicky sprinkled the glitter on and pressed in. I applied heat gun briefly. didn't like the thickness of the glitter, so I repeated steps above one more time. It does glow really nicely in the dark !

**
Applied some CM candy stickers and some other stickers I had for a while to the top of the pumpkin. Outlined the outside of face features in black ink.

Regrets on this project: I should have outlined the pumpkin features in black ink before applying glitter. Maybe should've only done one layer of the glitter. Should've used more candy stickers.

September 8, 2010

Ebay

Woohoo! I just had to share I won Stretch Your Imagination for $16.70 on ebay. I know...bad girl, I just said yesterday I wasn't going to buy so much. LOL


My favorite cake recipe

It is a tradition for my Mama to make the below cake every year for my birthday. Thought I'd share the recipe with you. It's moist, oo-ey, goo-ey and chocolaty.

Chocolate Fudge Bundt Cake

1 package Milk Chocolate Cake Mix
1 1/2 cups semi sweet chocolate chips (We've used milk chocolate and dark too)
4 eggs
1 cup sour cream
1 small box chocolate fudge instant oudding
1/2 cup cooking oil
1/2 cup warm water

**Dump everything but chocolate chips in a bowl and mix till smooth, approx 2 minutes. Fold in the chocolate chips. Grease bundt pan and pour in. Bake at 350 for 45 to 50 minutes.

Let cool and remove onto plate. Make chocolate ganache' icing and pour over the top.

September 7, 2010

All alone......random thoughts

So, if I never mentioned it, I have a 9 yr old dd in 3rd grade and my little man is 2 1/2. Today is his first day in our Church's preschool on Tues and Wed from 9:30 to 2:30. I AM ALL ALONE!!! :) :)

Until 6 months ago, I never realized how different boys & girls are. After going through fertility stuff for our dd, we never thought about the chances of having more children. I was totally into girly stuff. When our dd was 6 and around our 10th anniversary and me being almost 41 SURPRISE--I'm what? LOL. It was a pleasant and blessed surprise. Boys are wonderful and I love having a little man but never realized how active they are, keeping ya on your toes!! I really needed a little me time!

So why am I blogging instead of creating something? Well, I'm resting after going for a nice walk for an hour--it was 77 and can't beat that in Oklahoma. I finally came to some realizations yesterday. In 11 days, I will be 44 and I have young kids. I always do for others but I'm the only one who can take care of me. KWIM? Seems I'm running all the time--homeroom mom, PTA, I work part-time, housework, cook dinner....you know the routine....I need to take care of myself and respect my body, not just for me, but for my kids. I know you've heard the analogy of if you are on a plane and the oxygen masks come down--take care of yourself first and put it on and then deal with your kids. Same thing. My kids can't make me eat healthy, they can't make me go for nice walks to relieve stress and keep me healthy. Only "I" can take care of "Me!" So, I have made a promise to myself to walk 2 days per week, use my eliptical that is just collecting dust (do you have one of those? LOL) and eat better. I want to find a yoga class too. Oh, and start back taking my vitamins again.

I also discovered I spend way too much money on craft stuff. I'm going to give myself $50 fun money each month to spend on crafting or my favorite makeup or fun splurge.

Ok, now I'm off to use my gypsy and work on something for Halloween I've been thinking about.

Related Posts Plugin for WordPress, Blogger...